eConnect User Manual – Sales-Rep

LeanSwift eConnect for Infor M3 & Magento
Product Version 4.0.0
eConnect version 20.3.0
Table of contents
- GENERAL INFORMATION
GENERAL INFORMATION
1.1 System Overview
LeanSwift eConnect for Infor M3 provides a powerful, seamless integration between Magento and Infor M3 ERP. The product consists of a base Magento extension that extends standard Magento functionality and offers several transactions to ensure your eCommerce websites contain up-to-date information from your M3 ERP. There exist a number of optional add-on extensions too for additional functionality
LeanSwift eConnect for Infor M3 is available for Magento Open Source and Magento Commerce and for Infor M3 version 7.x and above. It is also compatible with multi-tenant cloud editions of Infor M3 (Cloudsuite).
LeanSwift eConnect for Infor M3 employs a layered architecture to allow flexibility in supporting different versions of Magento and Infor M3 and to allow independent upgrades.
## Architecture
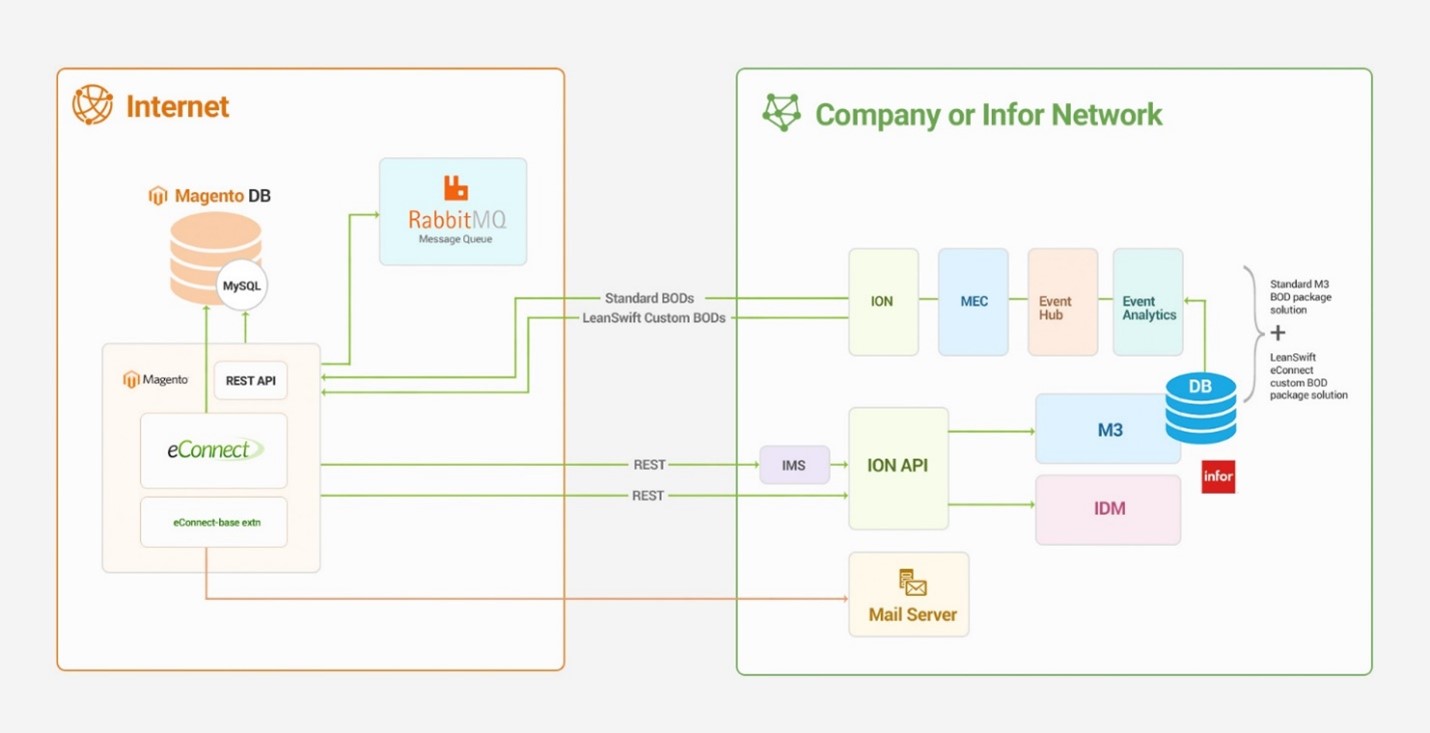
With 20.3.0, there is a major technical architectural change in the solution. BODs from ION are now configured to be sent to a REST API in Magento, which in turn sends them to RabbitMQ for storage and processing by eConnect. In the previous versions, ION sends BODs to RabbitMQ directly.
eConnect-base v5.0.0
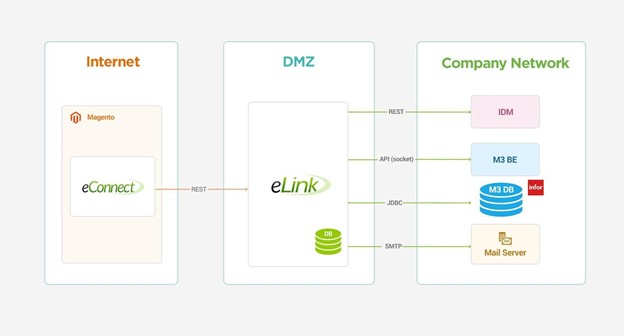
- It provides the connectivity to eLink and/or Infor systems with the use of a generic function which decides whether to call the eLink / ION APIs based on the M3 Connection Protocol chosen in the backend
- Acts as the communication layer for RabbitMQ Message consumption
- Acts as a core module for following LeanSwift Magento Extensions
- eConnect
- IDM
- Supplier Portal
-
eConnect add-ons depend on both eConnect-base and eConnect. eConnect and its Add-ons works only with eConnect-base configured
- IDM can now work without eConnect
The new version will coexist with the older version of eConnect which uses LeanSwift eLink and all new installations of eConnect have the ability to choose the connection protocol to M3, that is, either eLink or ION.
Architecture with LeanSwift eLink
Architecture with ION for multi-tenant Cloud M3
The add-ons for LeanSwift eConnect provide extended functionality over the standard features available on eConnect Core.
These add-ons can, if necessary, be modified, and new add-ons can be added to fulfill specific customer requirements.
User interface
During setup, the Magento Admin panel is used to configure which transactions that should be used and how they should function. There is also additional configuration within the Connector to support the transactions.
Validated versions
Magento Community 2.4.1
Magento Enterprise 2.4.1
Infor M3 16.x
1.2 Points of Contact
1.2.1 Information
This document and the software it describes are provided by LeanSwift Solutions Inc. For additional information regarding support, licensing, functionality etc. please contact LeanSwift Solutions Inc via contact form at http://www.leanswift.comor email info@leanswift.com
1.3 Organization of the Manual
This manual is not intended to cover any standard Magento functionality or user experience. The Magento user experience is customized and slightly different in each eCommerce implementation – though the general workflow is similar.
1.4 Acronyms and Abbreviations
ERP – Enterprise Resource Planning
2.0 Sales rep ADD-ON
2.0.1 Summary
The Sales Rep add-on to LeanSwift eConnect for Infor M3 provides an internal Sales Representative the ability to leverage Magento to manage his/her customers, review their customer’s existing orders as well as place new orders on behalf of any of their customers.
From version 17.2 onward, LeanSwift eConnect has functionality that enhances the synchronization of the Sales Rep setup between M3 and Magento. The overall experience in working in Sales Rep mode within Magento is also enhanced.
The general approach is that a Sales Rep can login via Magento Admin where a user has been automatically added via eConnect and do the following things
❖ Review and adjust the details of any of the customers they are connected to [in M3 and as such also in Magento].
❖ Review any existing sales orders placed within Magento by any of the customers they are associated with.
❖ Create sales orders on-behalf of any customer they are associated with.
2.0.2 Assumptions/Limitations
A Magento Admin will initially configure the Role Resources within the SalesRep role under System > Permissions > Roles according to LeanSwift recommended settings detailed in Section 2.1.2.3.
2.1 CONFIGURATION
2.1.1 M3 Configuration
NOTE - Depending on the M3 version used, the configuration requirements can be slightly different. The most notable difference is that in the later versions of M3 (13.x) – the system requires a Sales Rep code (or Sales Person as M3 refers to it as) to be setup as a user first within ‘User. Open’ (MNS150). This requirement did not exist in earlier versions of M3.
User Setup The Sales rep code first needs to be defined as a user in ‘User. Open’ (MNS150) in M3.

In this case, the details within the user setup aren’t as important as for a regular user. There are however some fields that are required:
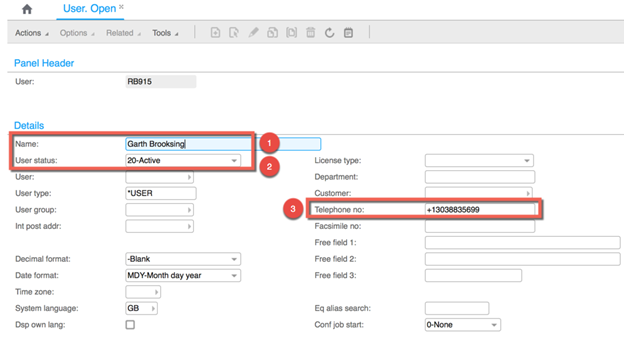
(1) Name – this is the Name for the Sales Representative that will also be used in the next step of the setup.
(2) User status: needs to be ‘20’ to indicate an active user.
(3) Telephone no: if this value is filled in, eConnect will bring it over to the Sales Rep setup in Magento.
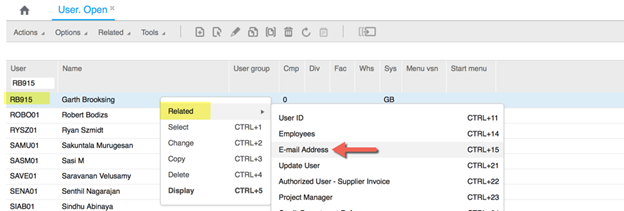
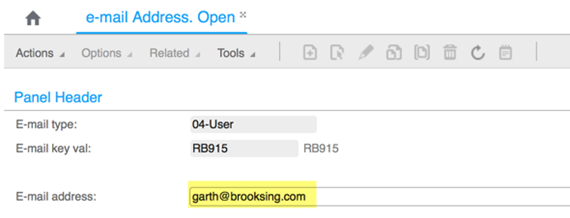
In Magento, e-mail address is a required field for a user. Due to this, it’s recommended that each Sales Rep is configured with an e-mail address within M3 the following way:
 </kb>
</kb>
 </kb>
</kb>
 </kb>
</kb>
If no e-mail is entered for the Sales Rep user in ‘e-mail Address. Open’ (CRS111) in M3 [which is not mandatory], eConnect will generate and add an e-mail on the Sales Rep user in Magento. The e-mail is generated per the following logic:
First 4 letters of the first name + sales representative code. For example, if the first name of the representative is Robert and the code is 0001, then the email ID should be robe0001@example.com.
Sales Person Setup
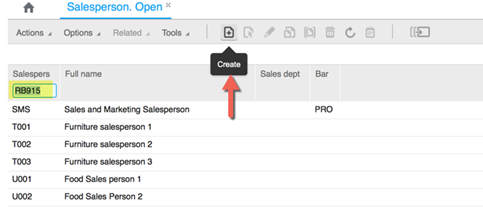
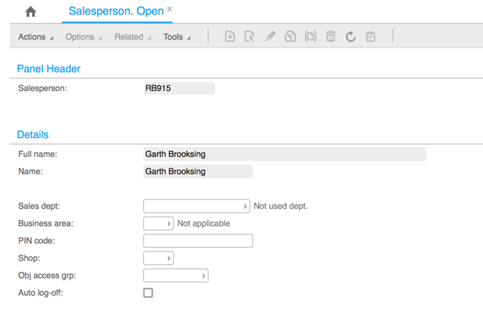
Once the user has been defined in MNS150, the Sales Person ID can be added to ‘Salesperson. Open’ (CRS100).
 </kb>
</kb>
 </kb>
</kb>
The ‘Full name’ and ‘Name’ values are brought in from the user setup in MNS150. No other fields are required [provided that for example ‘Sales dept.’ have been configured with a “blank’ table value.]
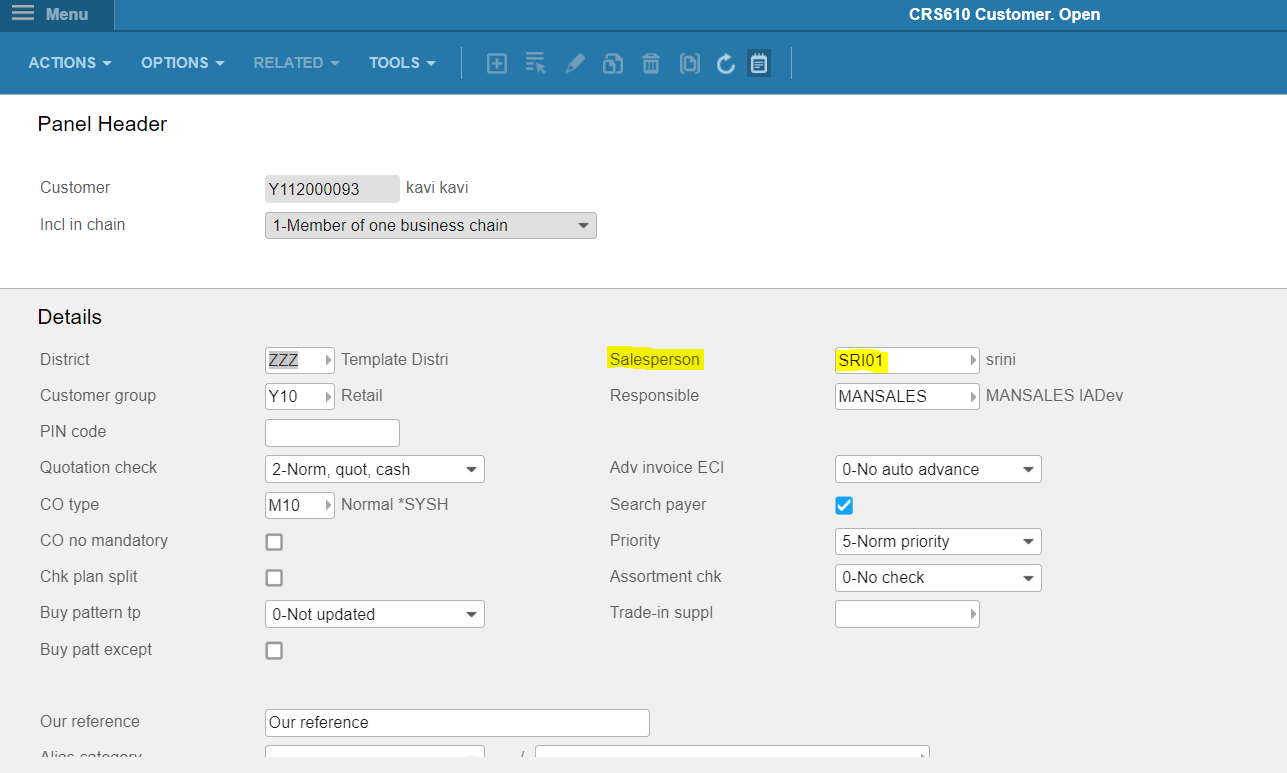
Customer Connection The final step in the M3 configuration is to connect the Sales Rep to the customer’s he/she will be responsible for.
NOTE – In order for the Sales Rep to be synchronized over to Magento, the code needs to be associated with at least one customer in M3. This is in order to ensure that only active Sales Reps are brought over to Magento.
A Sales rep is associated to a customer in ‘Customer. Open’ (CRS610/F):
2.1.2 Magento Configuration
This section covers the various configuration available within Magento.
2.1.2.1 Magento Configuration-eLink
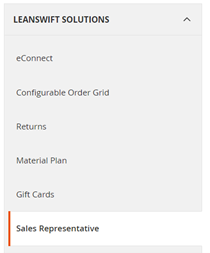
There are two LeanSwift specific configuration options. These can be found under LeanSwift > eConnect-add-ons > Sales Representative. It’s advised to not change the Sales Person Role value
 </kb>
</kb>
 </kb>
</kb>
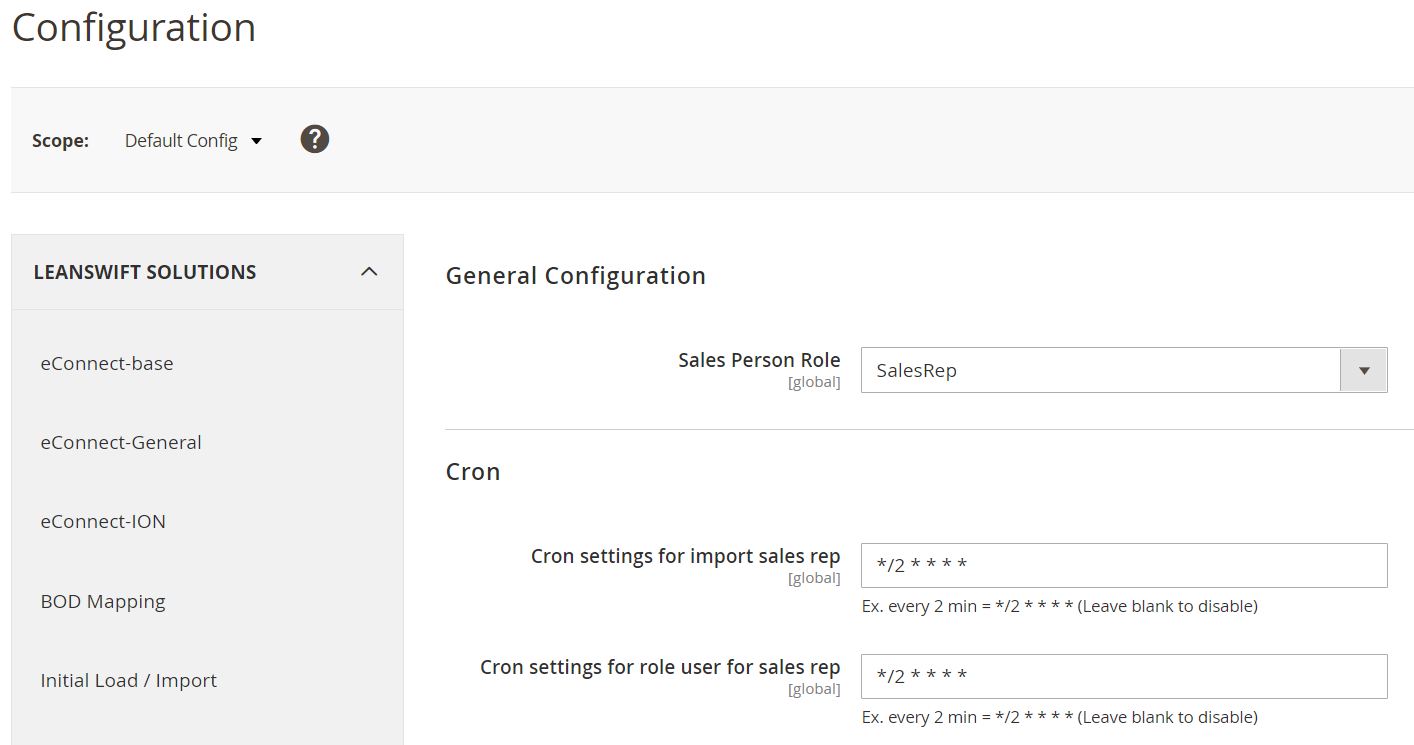
(1) Sales Person Role defines which user role the Sales rep users should be assigned within Magento when created by the LeanSwift cron job.
(2) Enable TimeStamp essentially controls whether to only read changed records in M3 (Yes) or all records in M3 (No) each time the Sales Rep background sync is run. We recommend this parameter be set to ‘Yes’ to increase performance.
2.1.2.2 Magento Configuration-ION
The only difference between eLink and Ion version is the ‘Enable Timestamp’ option which is removed in ION.
2.1.2.3 Additional Configuration
There are two key parts to the Magento setup for the Sales Rep add-on: Sales Rep entry & Sales rep user creation.
To handle these two components in Magento, two new cron jobs have been added to eConnect:
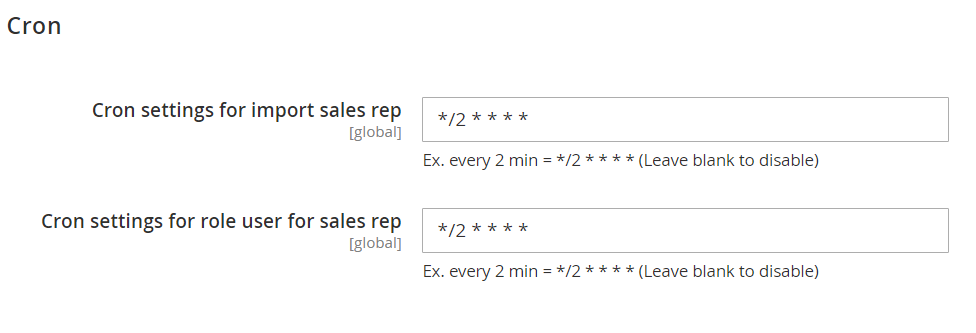
(1) Cron settings for import sales rep
(2) Cron settings for role user for sales rep
(1) handles the creation of the actual Sales rep within Magento, i.e. brings over the pertinent data from CRS100 & MNS150. The results can be found in the new Magento section ‘Manage Sales Representative’, which can be found under the ‘Customers’ main menu within Magento Admin.
The Cron settings for import sales rep cron also ensures that the link to the Sales Rep code is put in place on all associated customers in Magento.
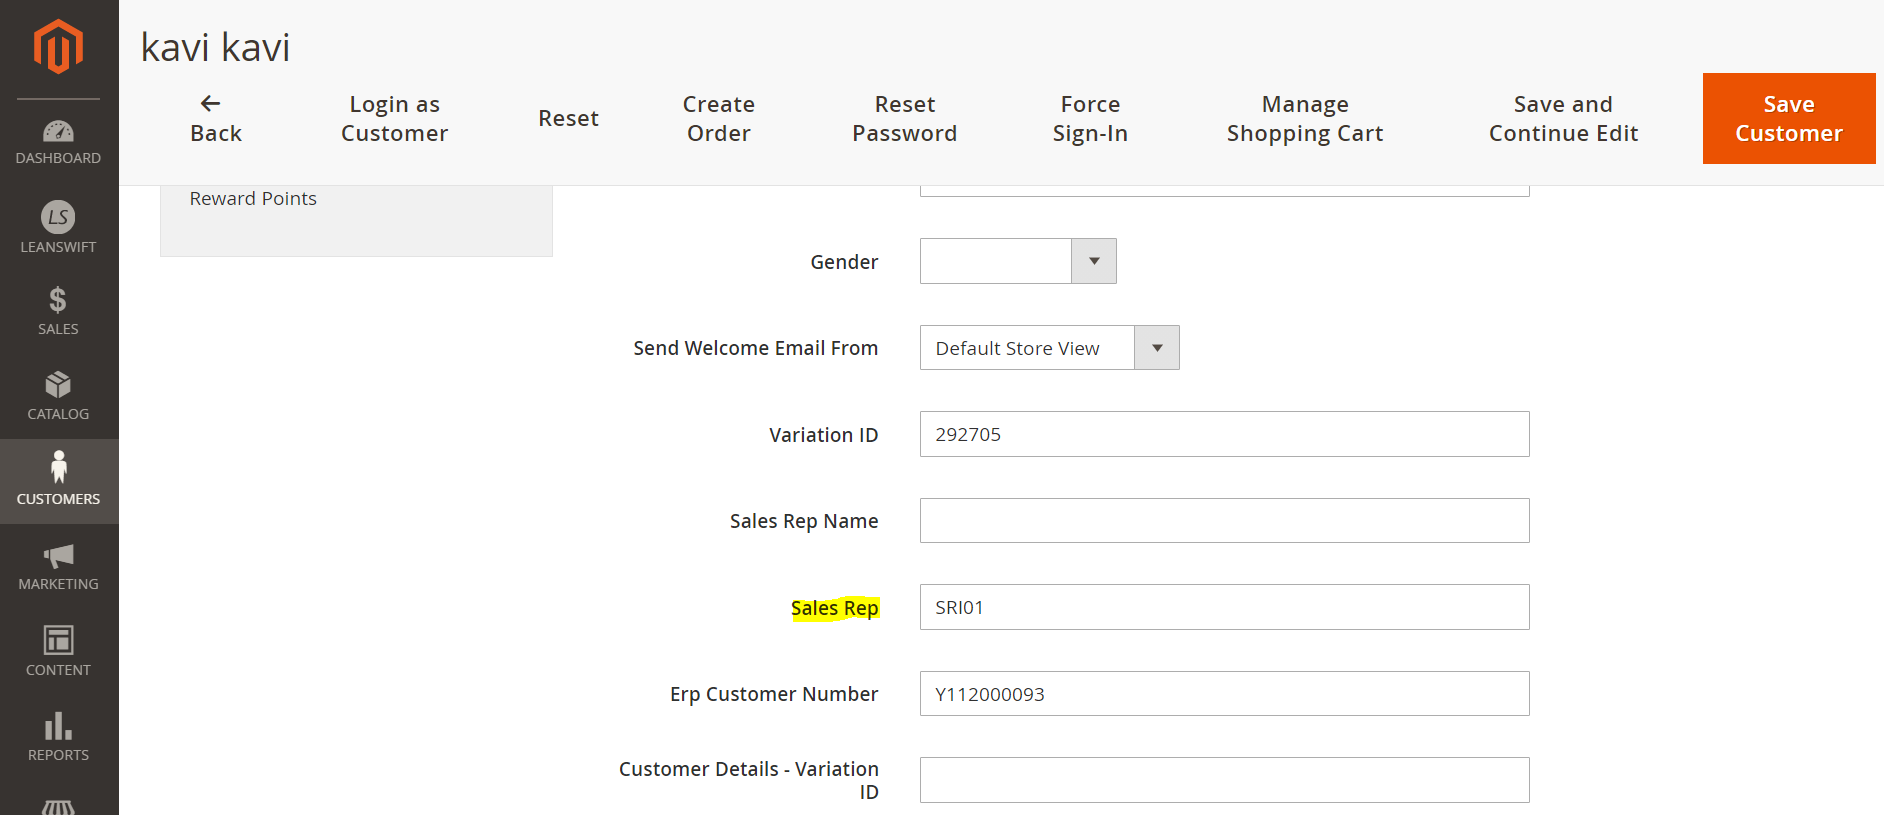
When a customer-salesrep mapping is done in M3, Bod is received and it gets updated in magento. Sales Rep can be found under Account Information of Customer in Magento.
The second cron job (2) ensures the Sales rep gets added as an active user with the appropriate permissions in Magento (System > Permissions > Users):
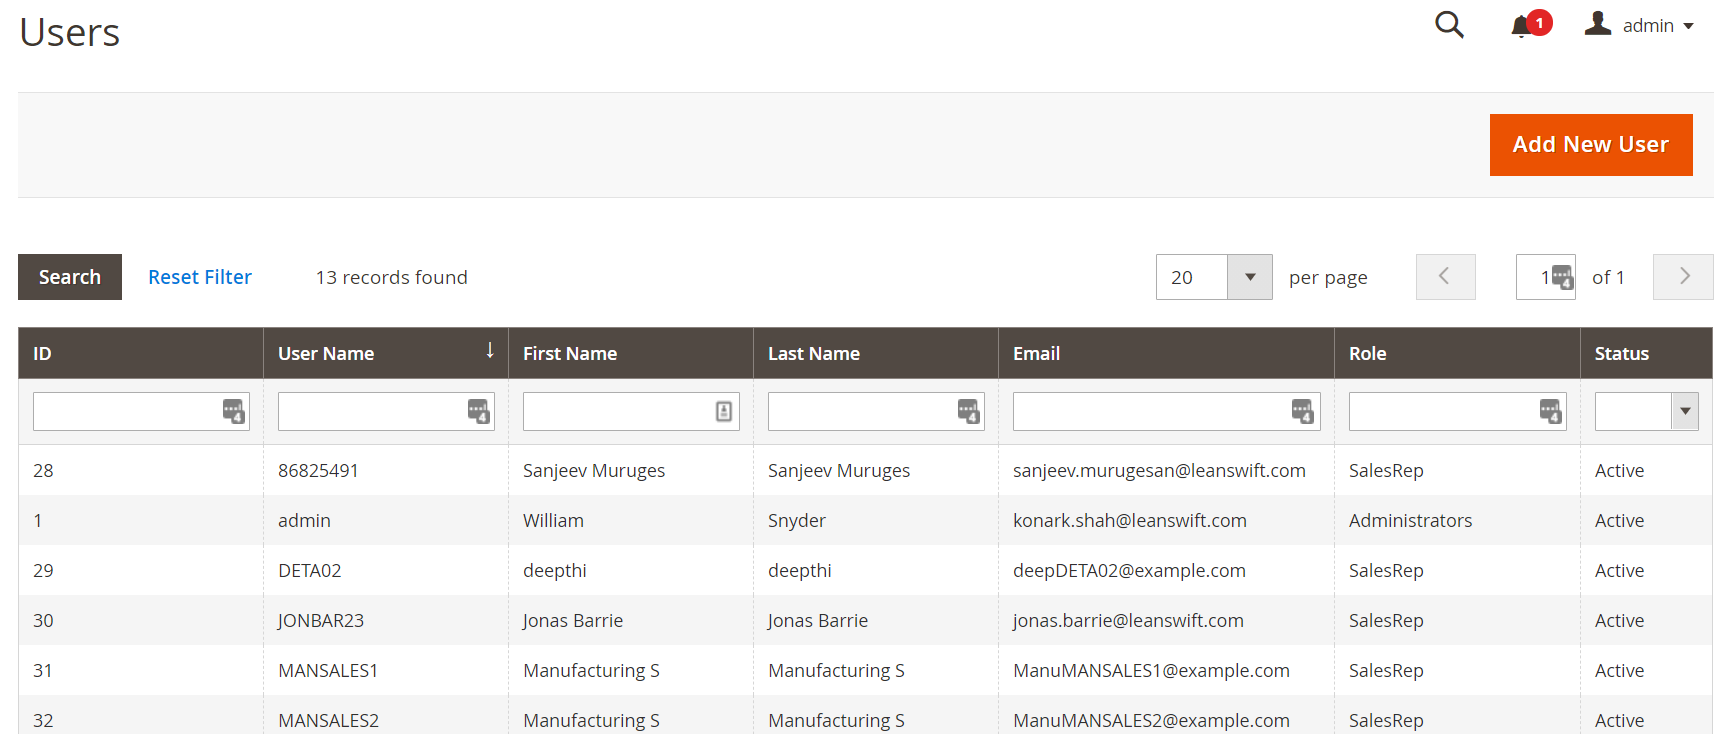
The password for each Sales Rep is automatically set to be [Salesrep1+Sales Rep code]
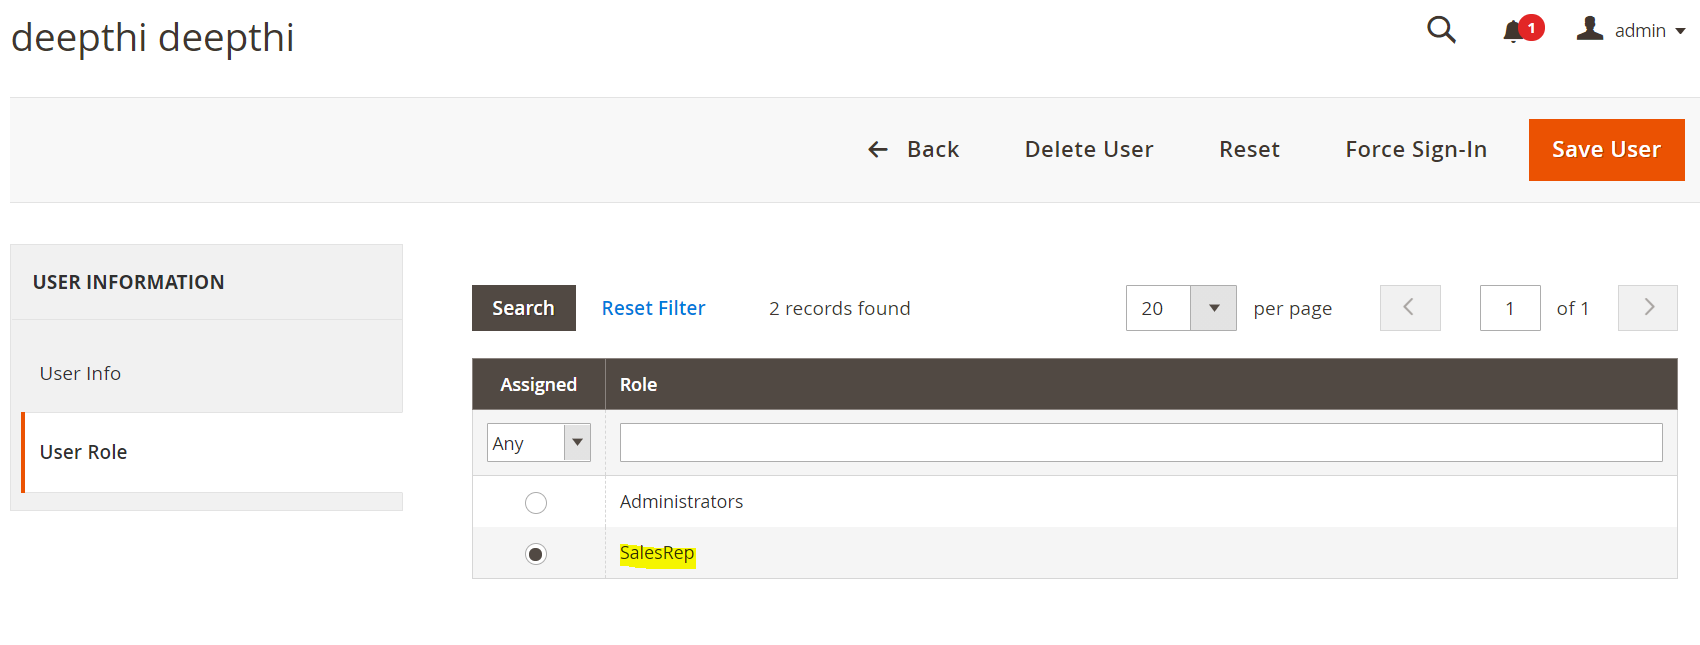
One new User Role, ‘SalesRep’, is automatically added to Magento when the Sales Rep module is installed [per the configuration detailed in section 2.1.2.1].
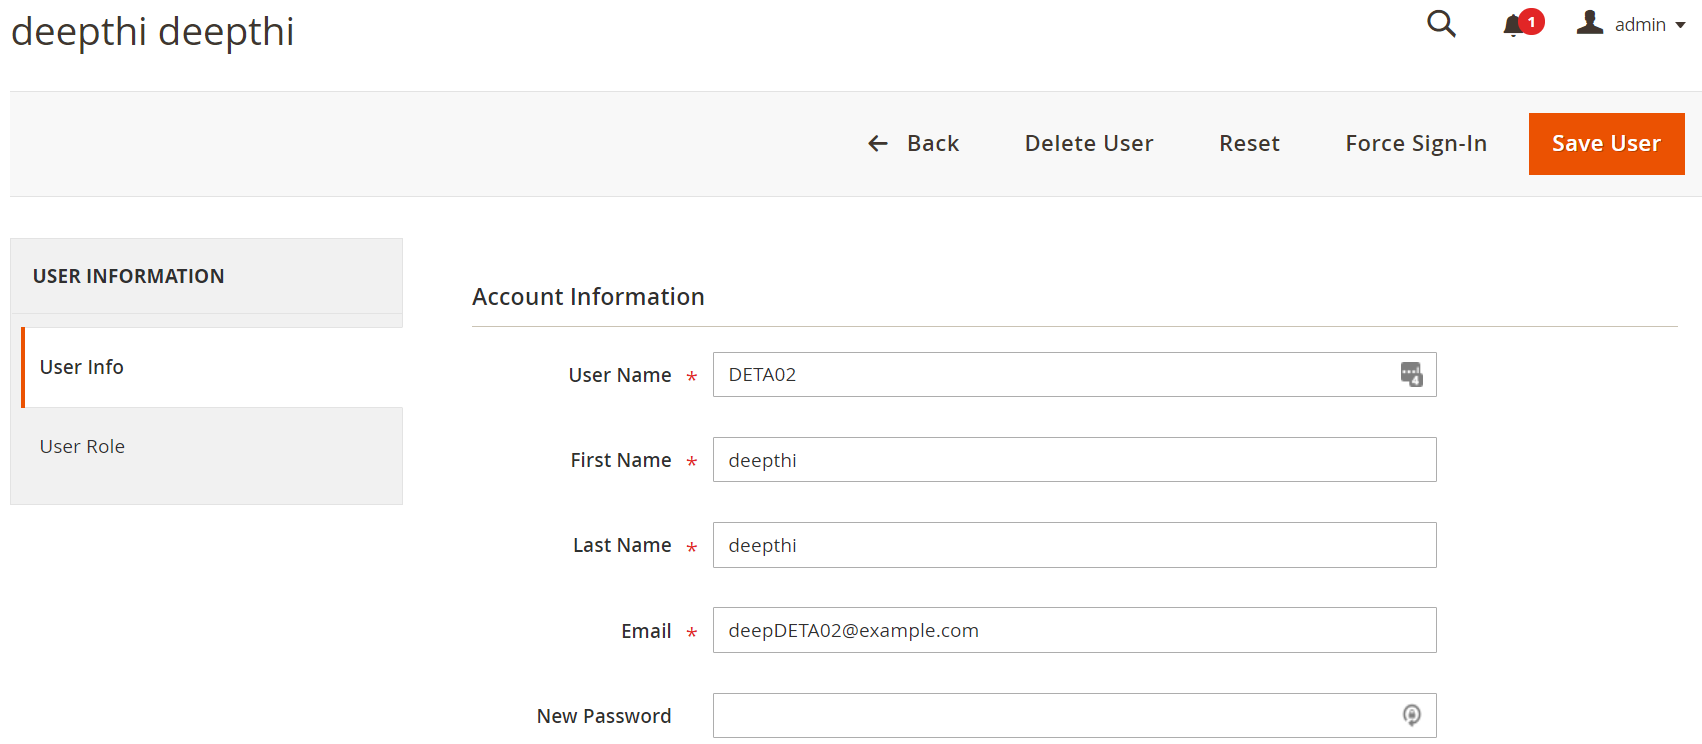
Open one of the user to view user information as below. A new field to designate the Sales Rep code per user in Magento has also been added:
Role Setup
New in this version
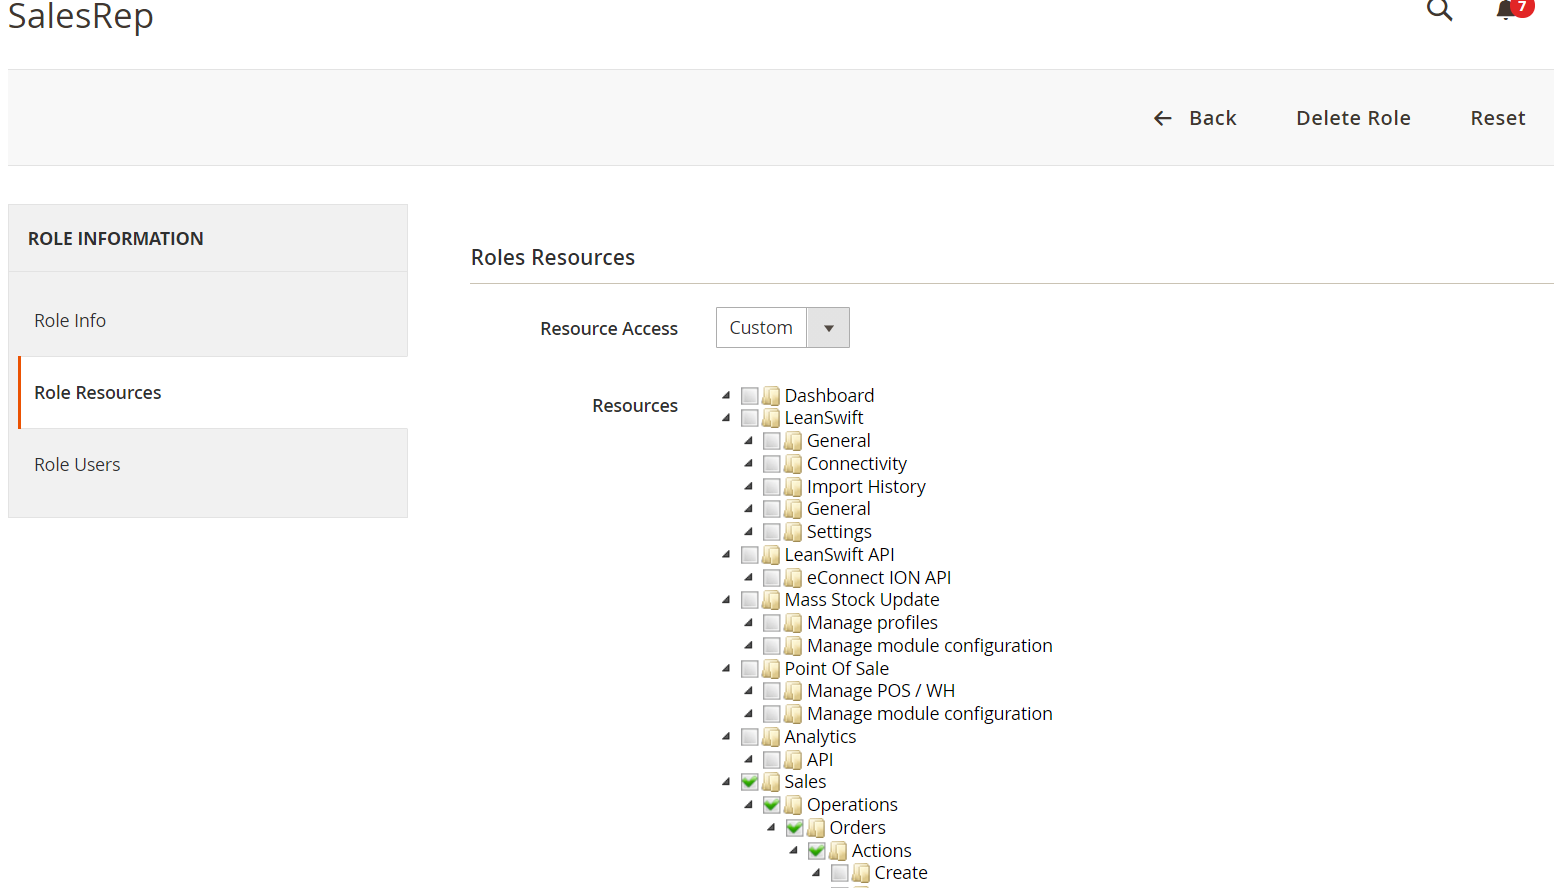
Role permissions for a Salesrep will be automatically added during instalation. If required addtional changes or modifications can be done futher. This is handled under the Role Resources tab in System > Permissions > User Roles.
LeanSwift enables the following roles for SalesRep role as below with regards to the Role Resources.
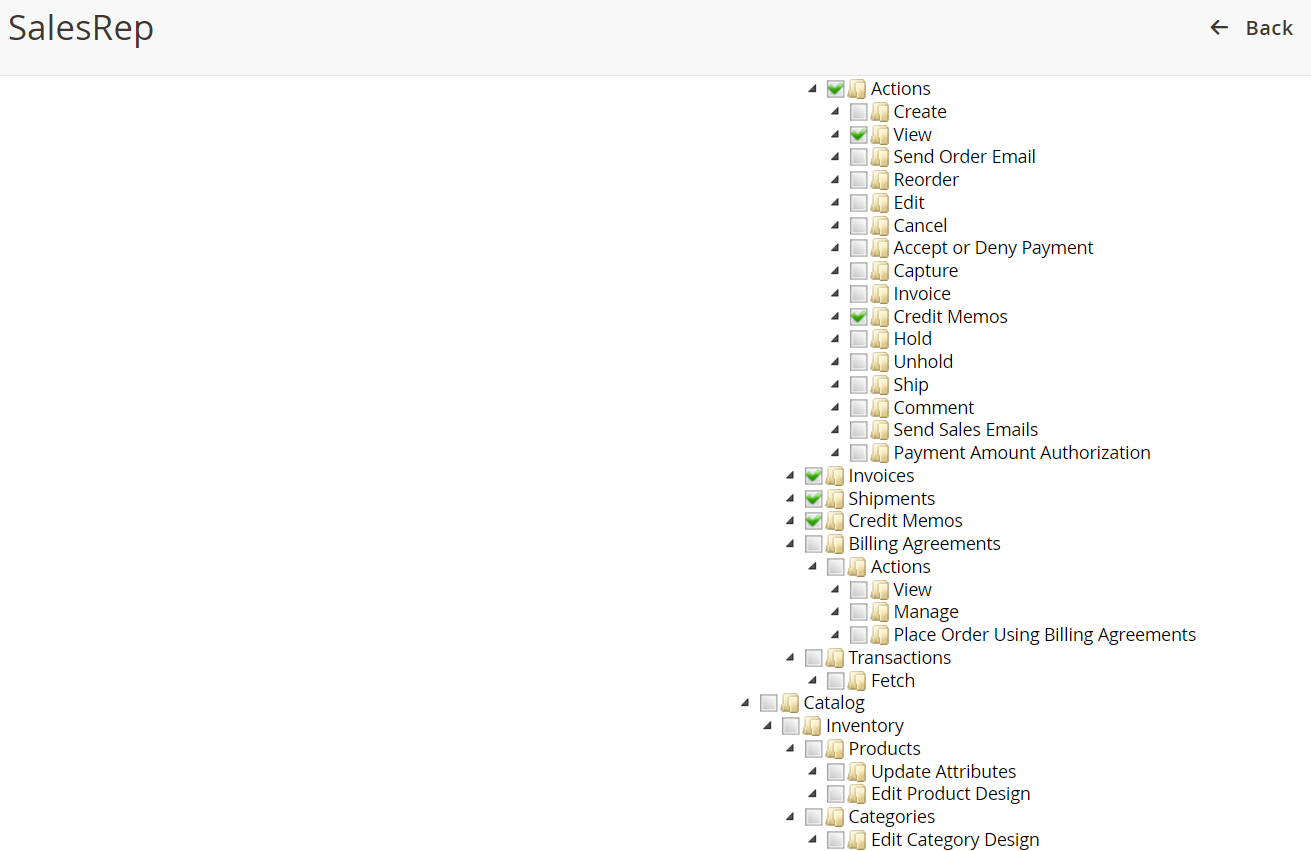
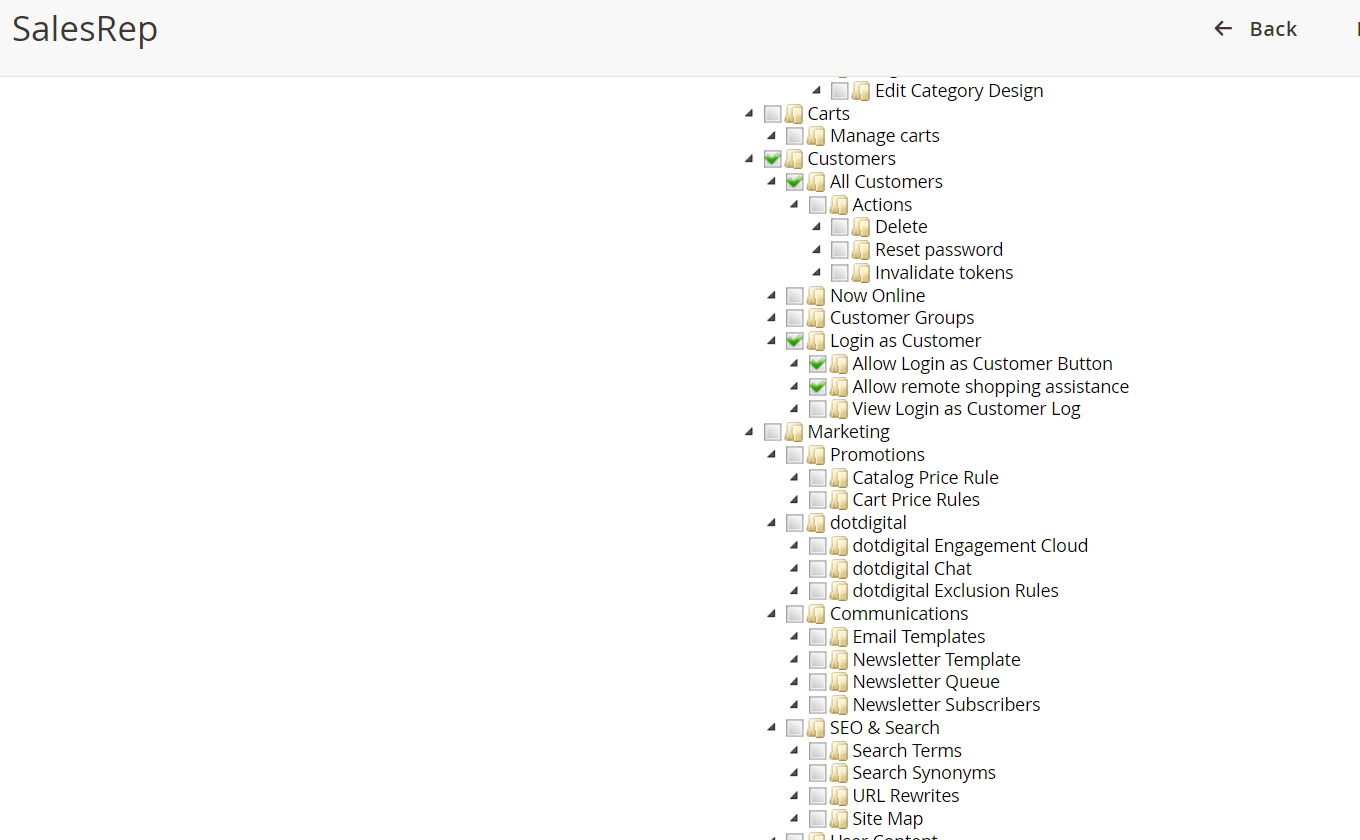
2.1.3 Process Changes
This section covers the specific features within the Customer management and ordering processes the Sales Rep add-on.
2.1.3.1 Login
For a Sales Rep to login the first time, the following credentials have been auto-assigned to them:
User: [Sales Rep code] Password: [Salesrep1+Sales Rep code]
The Sales Rep is presented with a stripped down version of Magento Admin, and is by default taken in to Customers > Manage Customers grid where the list of their customers is displayed.
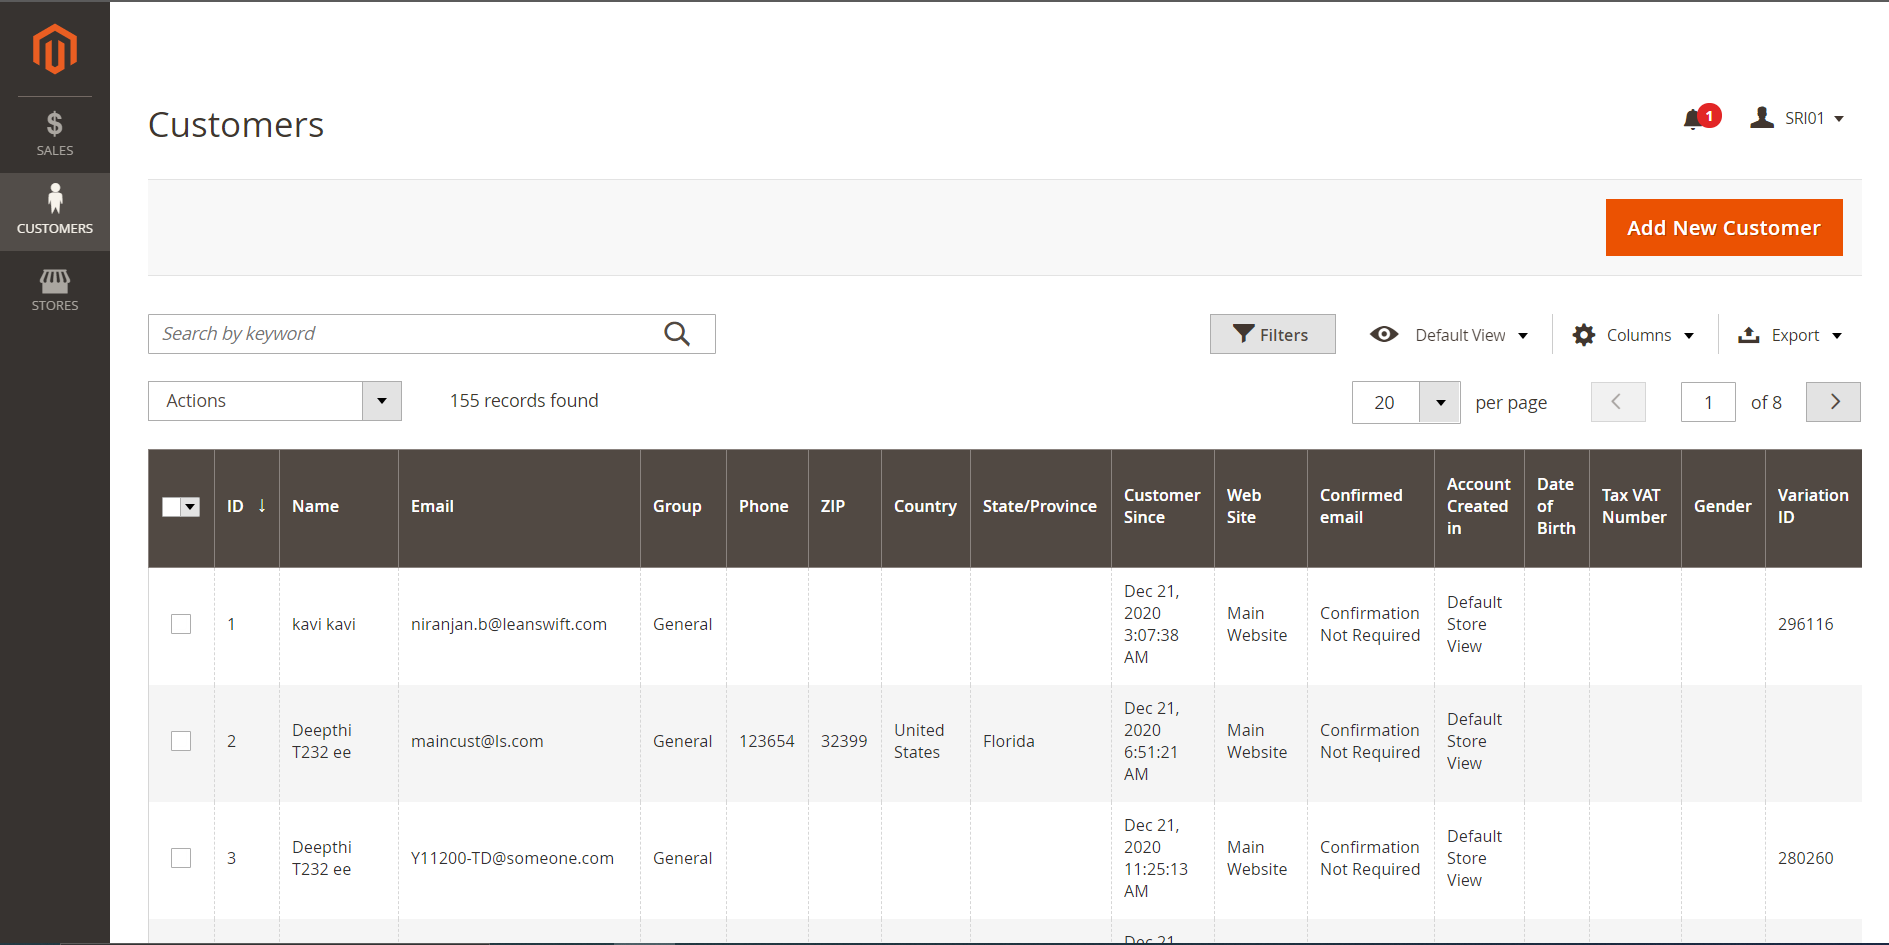
Only options available are related to those specific customers the sales rep is responsible for (and hence associated with in both M3 and Magento).
The only parts of Magento Admin that are available for the Sales Rep is Sales and Customers and Marketing
2.1.3.2 Customer Management & Order Creation
Under the Customers section, the only part that’s available to access for the Sales Rep is the Manage Customers subsection. Selecting this is what brings up the Customer’s grid displayed above.
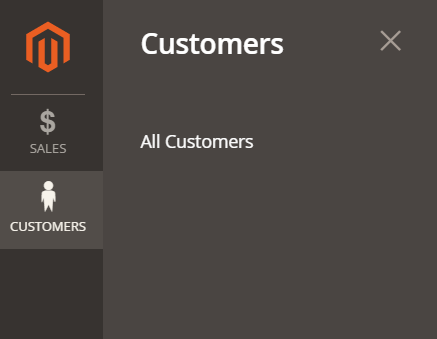
Once a Sales rep has opened the details of a Customer record, they can access all the key information in there related to that customer and also edit the customer record.
The Customer details are accessed by simply clicking on one of the customers anywhere on the row [or the ‘Edit’ hyperlink in the Action column].
It’s also from there that the Sales Rep has the option to login on-behalf-of the customer and in this way place & manage orders from the Magento front-end for them.
This is done by pressing the 'Login as Customer' button in the header of the Customer record.
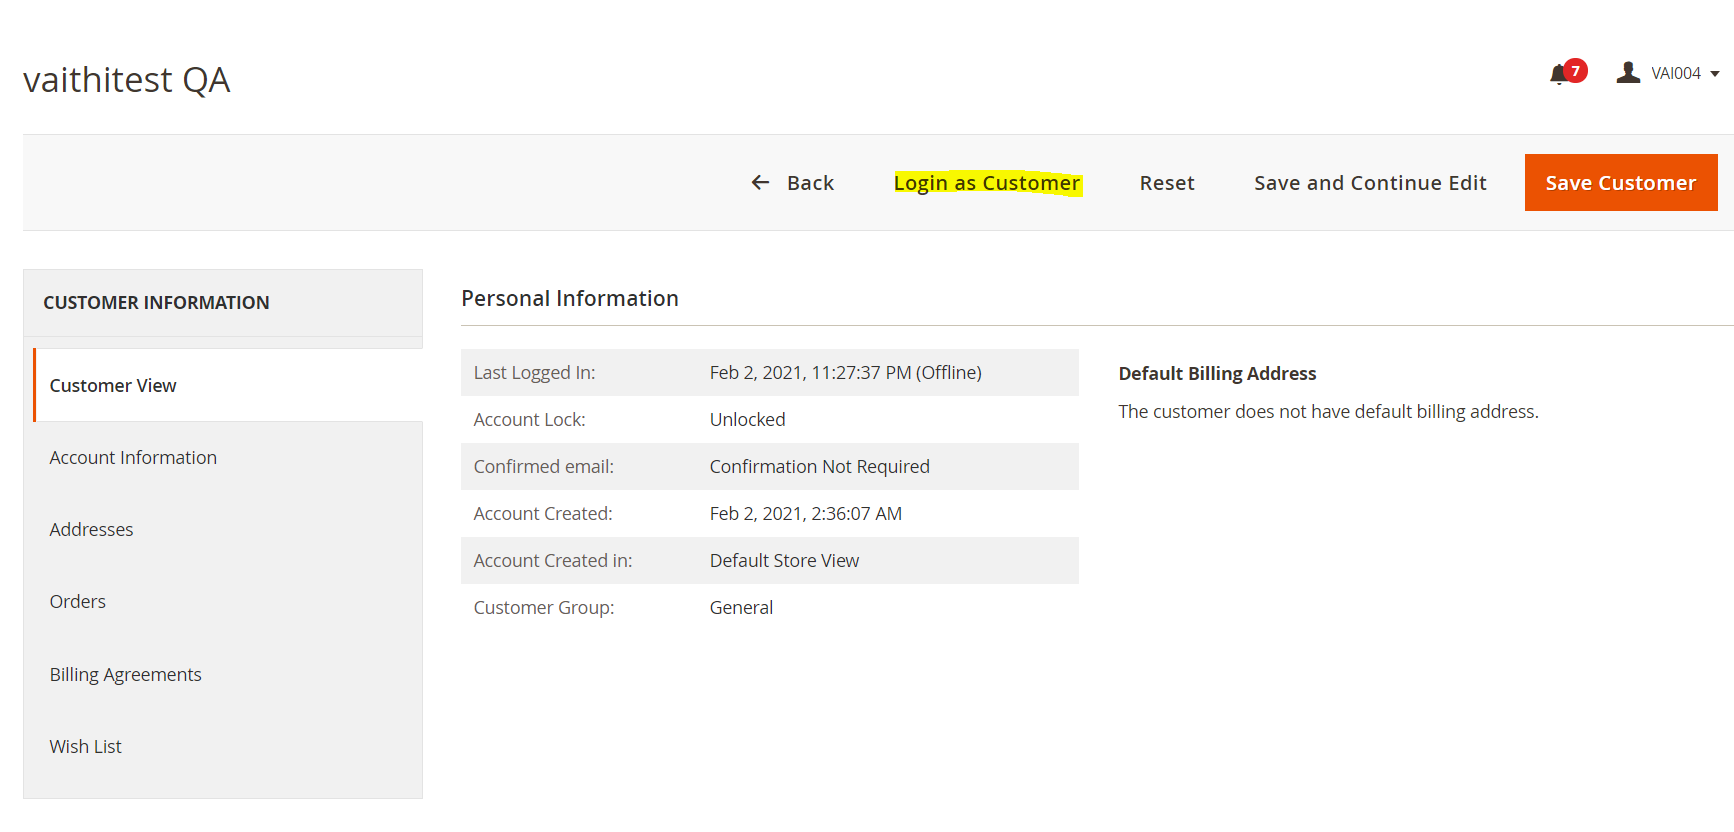
New in this version
From Magento 2.4.1 onwards, there is a 'Login as Customer' option provided by magento itself. (Earlier it was part of Salesrep). For this to work, 'Allow remote shopping assistance' must be enabled and this will happen automatically when 'Cron settings for import sales rep' gets executed
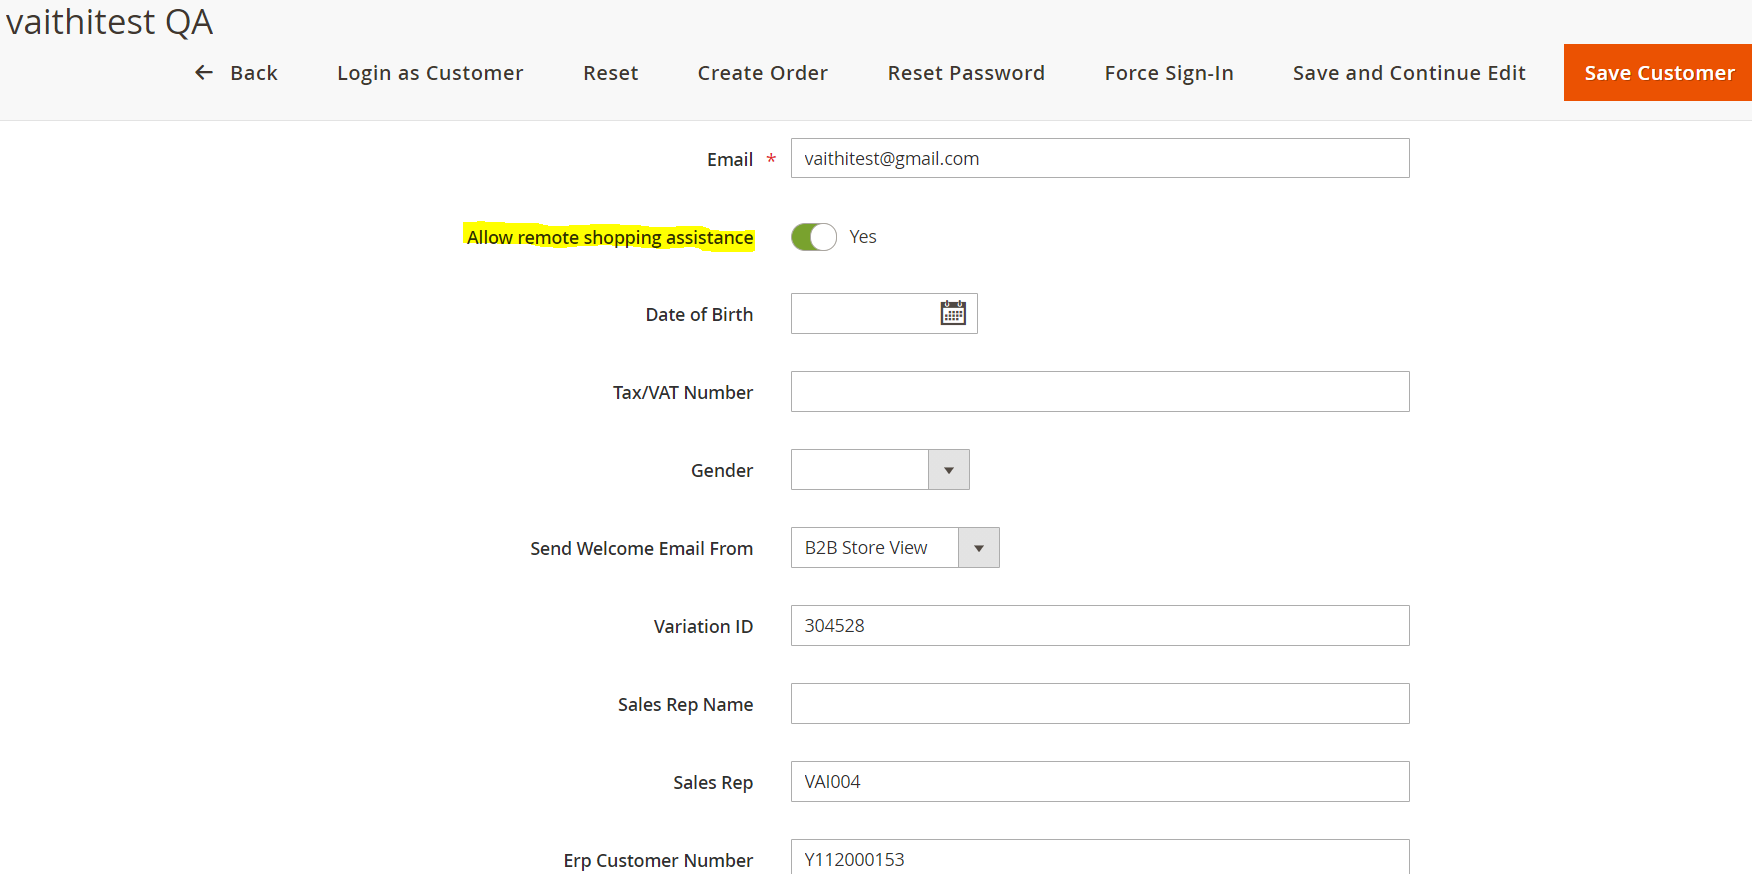
The rest of the behaviour is same as previous versions.
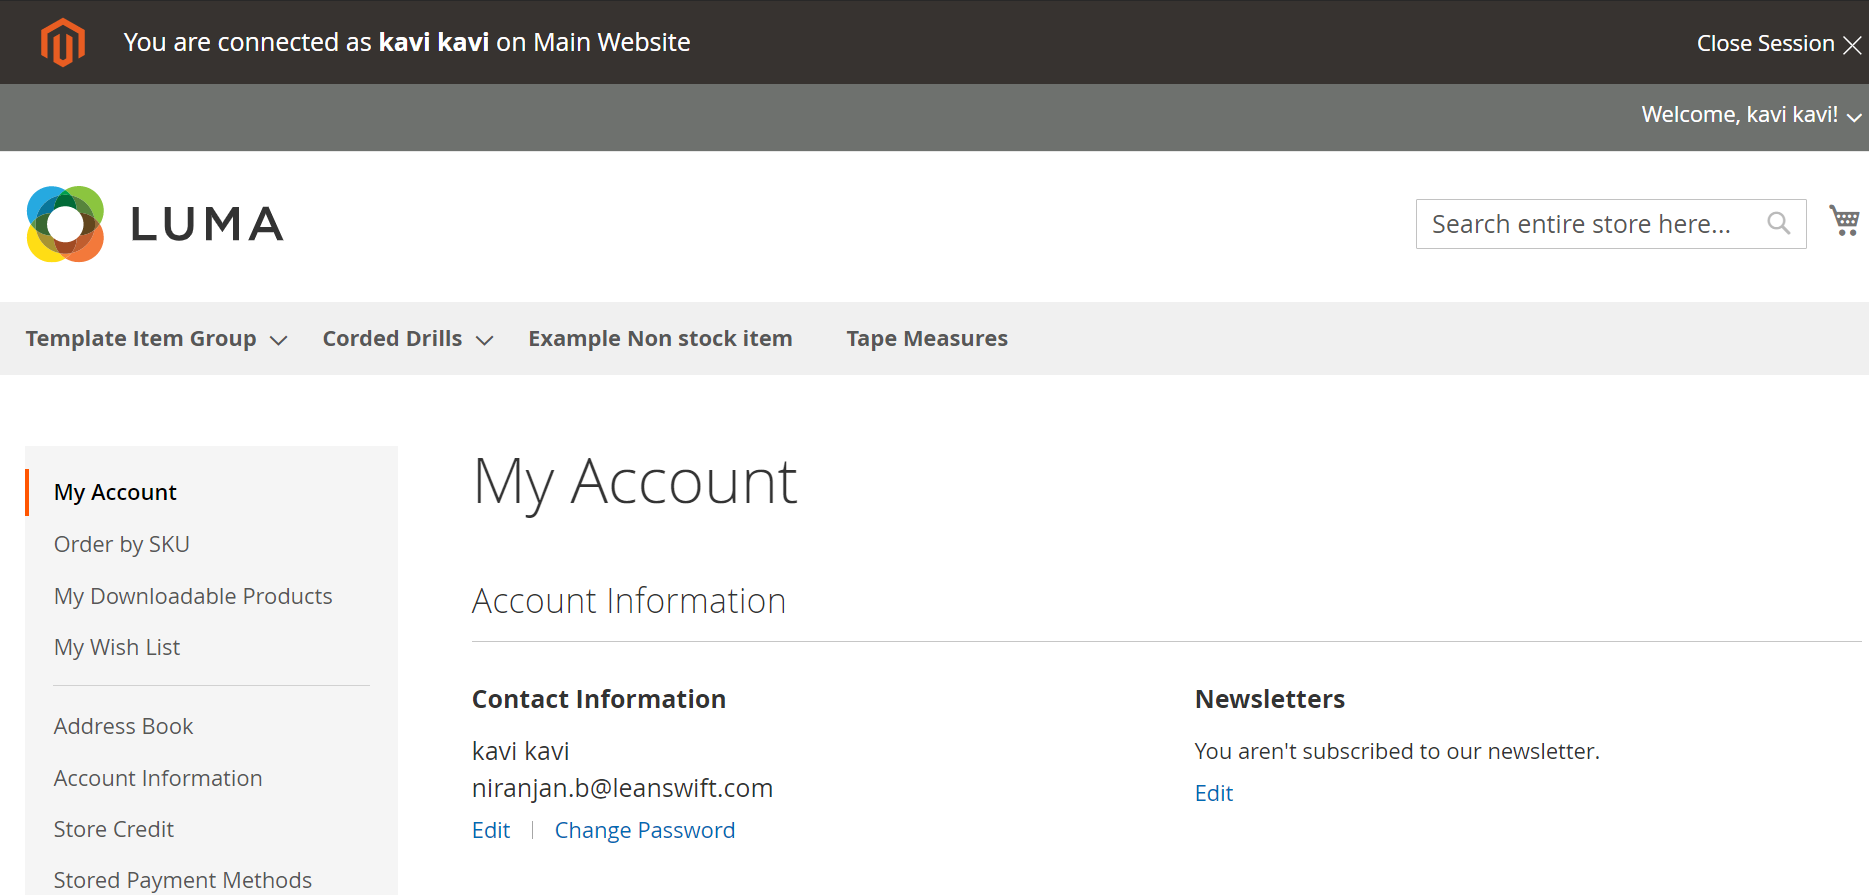
Pressing 'Login as Customer' will log the Sales Rep in as that particular customer from the front-end of Magento. This way, he/she now has access to all of the same things regarding order creation, order- & invoice history etc.
2.1.3.3 Sales Management
The final feature of the Sales Rep add-on relates to the various parts of the Sales section within Magento Admin the Sales Rep can access.
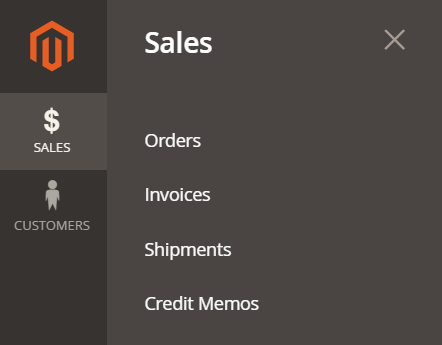
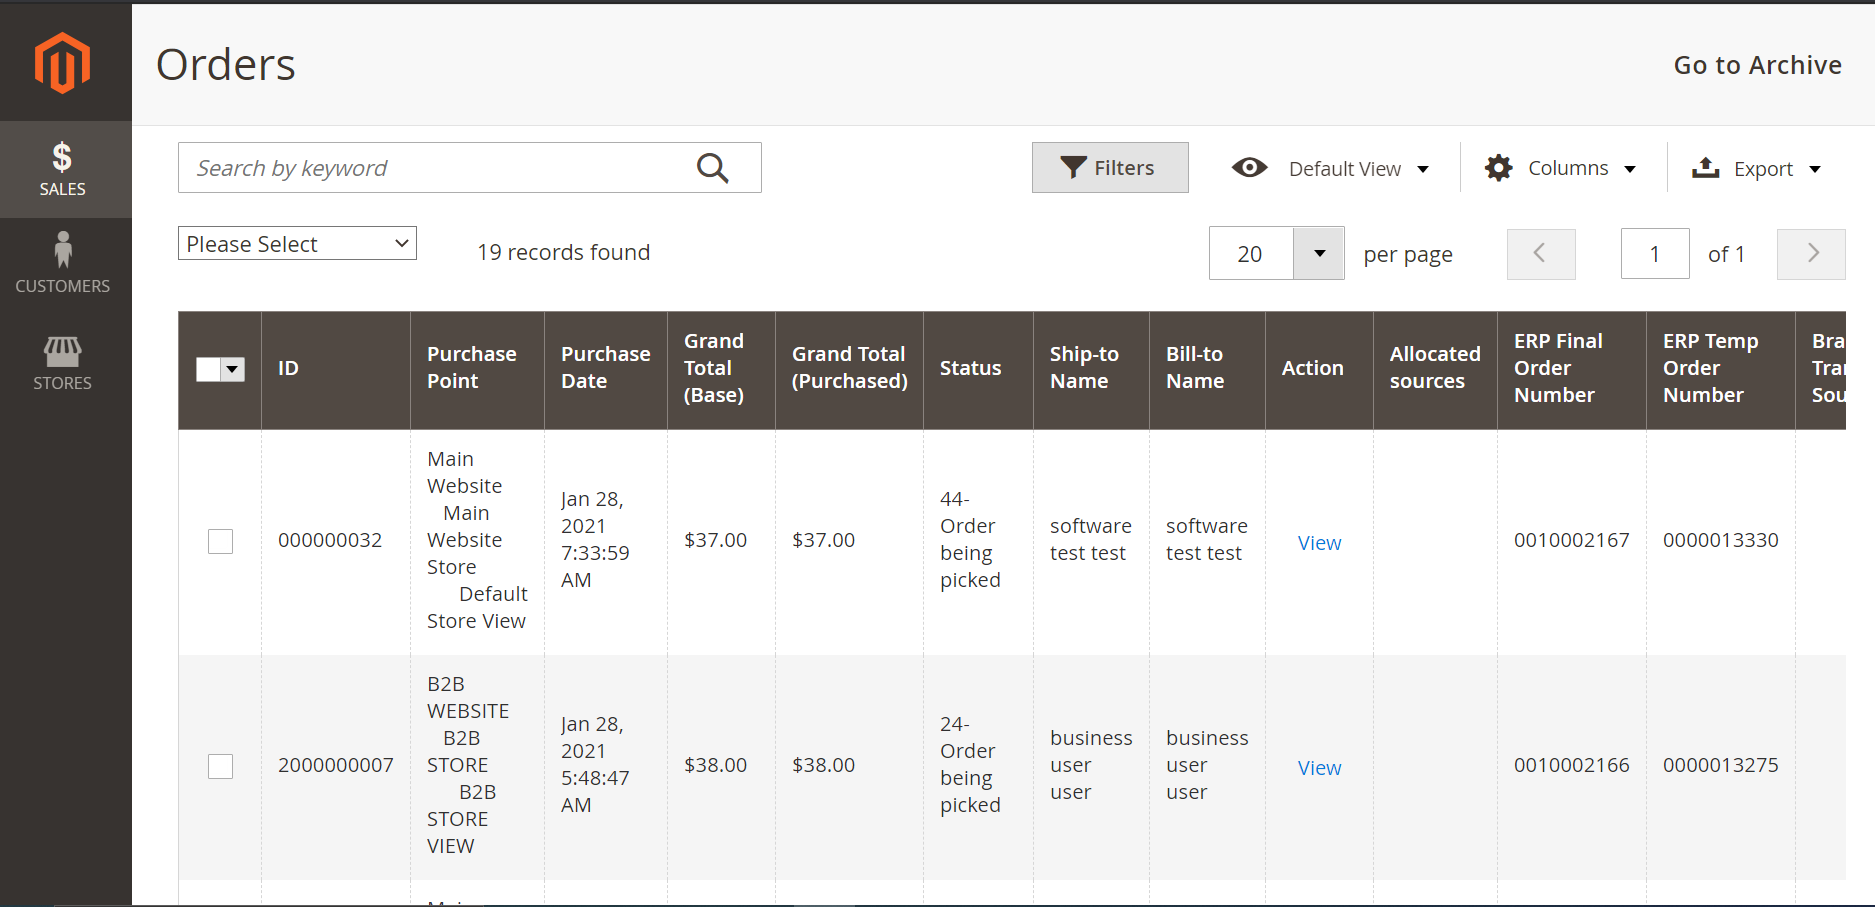
From within Magento Admin, the Sales Rep can view existing orders, Invoices & Shipments (some of which then of course can also be accessed via the front-end).
If the suggested configuration of the SalesRep role has been followed, the Sales Rep won’t be able to edit any of the existing transactions, send e-mails to customers etc. – but simply view existing transactions for informational purposes.
Order grid overview:
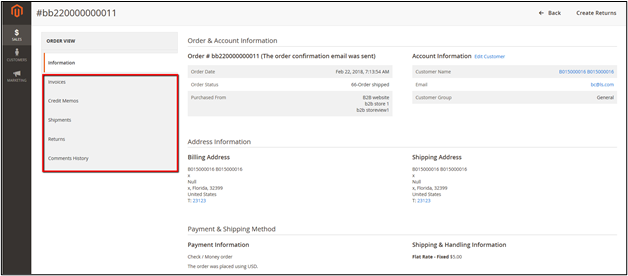
Order detail view, including access from within the order to related Invoices, Credit Memos, Shipments, RMA’s as well as the Comments History of the order in question:
 </kb>
</kb>
Optionally, the Sales rep can go in and review all Invoices and Shipments together across all of their customers. The Invoices are accessed via Sales > Invoices:

And the complete list of Shipments for all their customers together can be accessed in a single list via Sales > Shipments:
 </kb>
</kb>
Note
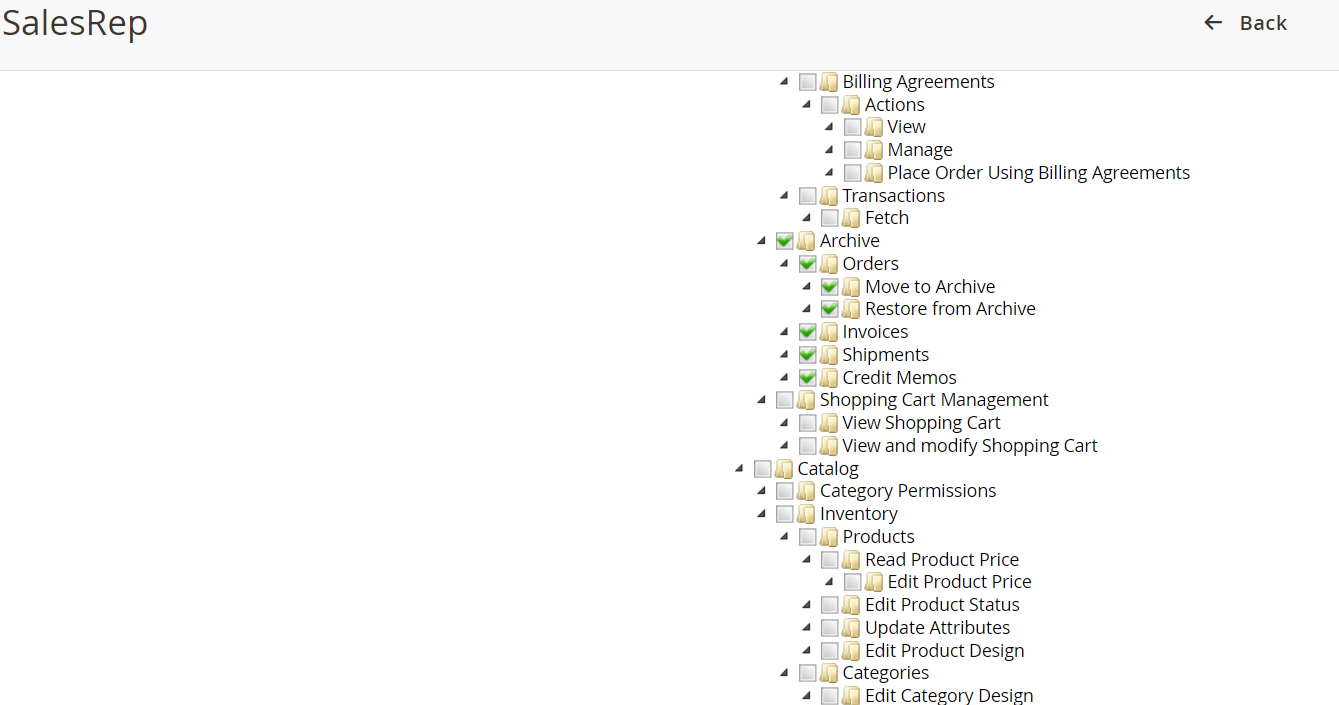
- For Shipment and Invoice tabs to be visible for an order in order detail page, extra permissions to ‘Archive’ section has to be provided. Note: This is applicable only for Magento Commerce 2.4.1.
-
Orders associated to multiple customers may get displayed in the Sales Rep Login. If Multiwarehouse and Order Edit Add-ons are also installed along with Salesrep To overcome this, We need to disable those Add-ons.
-
Clicking on Shipment tab may throw an error. This will happen if Salesrep is used along with Multiwarehouse Add-on. To overcome this, we need to install v7.7.6 version of Wyomind_AdvancedInventory in Multiwarehouse.