
Version 20.2.0 - User Manual - Supplier User
Table of contents
- System Overview
- User Guide for Suppliers
System Overview
LeanSwift Supplier Portal is a supplier self-service web portal that enables efficient online communication with vendors. It is seamlessly integrated with Infor M3 Cloudsuite via ION. Supplier Portal helps automate the entire purchase-to-pay process for the customer.
Organization of the Manual
This manual describes the frontend look and feel of LeanSwift Supplier Portal for Infor M3 and is meant for the Portal user(Supplier Representative).
To view the user manual for Portal admin, click here.
Architecture
The solution is built on Magento Open Source Platform. It interacts with Infor M3 via Infor ION Platform. RabbitMQ is the message queue used to send/receive messages to/from ION.

Features
- Account
- Registration and Login
- View Supplier Information
- User Date Format Setting
- Purchase Orders
- View Purchase Orders
- Search/Filter/Sort on Purchase Orders
- Confirm Purchase Orders
- Download Purchase Orders Information
- Upload documents into IDM against Purchase Orders
- This is available ONLY if additional functionality for IDM integration is included as part of license
- Purchase Proposals/Forecasts
- View Purchase Forecasts
- Search/Filter/Sort on Purchase Forecasts
- Performance Metrics
- View Quality metrics based on rejected quantity
- View Delivery Performance metrics
- View Purchase Price Variance metrics
- Admin
- Settings and Configuration for Portal and M3 Connection
User Interface
During setup, the Magento Admin panel is used to configure the portal. Some of the images and colors used in the user interface are configurable via the admin panel. The portal is accessible via any device using a web browser.
Validated Versions
Versions of various software components used in Supplier Portal:
- Magento Open Source: 2.3.4
- eConnect Base Module: 2.0.0
- RabbitMQ: 3.8.3
IDM functionality was validated using
- IDM Module: 3.0.0
Point of Contact
This document and the software it describes are provided by LeanSwift Solutions Inc. For additional information regarding support, licensing, functionality etc. please contact LeanSwift Solutions Inc. via contact form at http://www.leanswift.com or email info@leanswift.com.
User Guide for Suppliers
Registration
Registration Page is used to register the user as supplier. Supplier portal registration page is displayed looks like below,
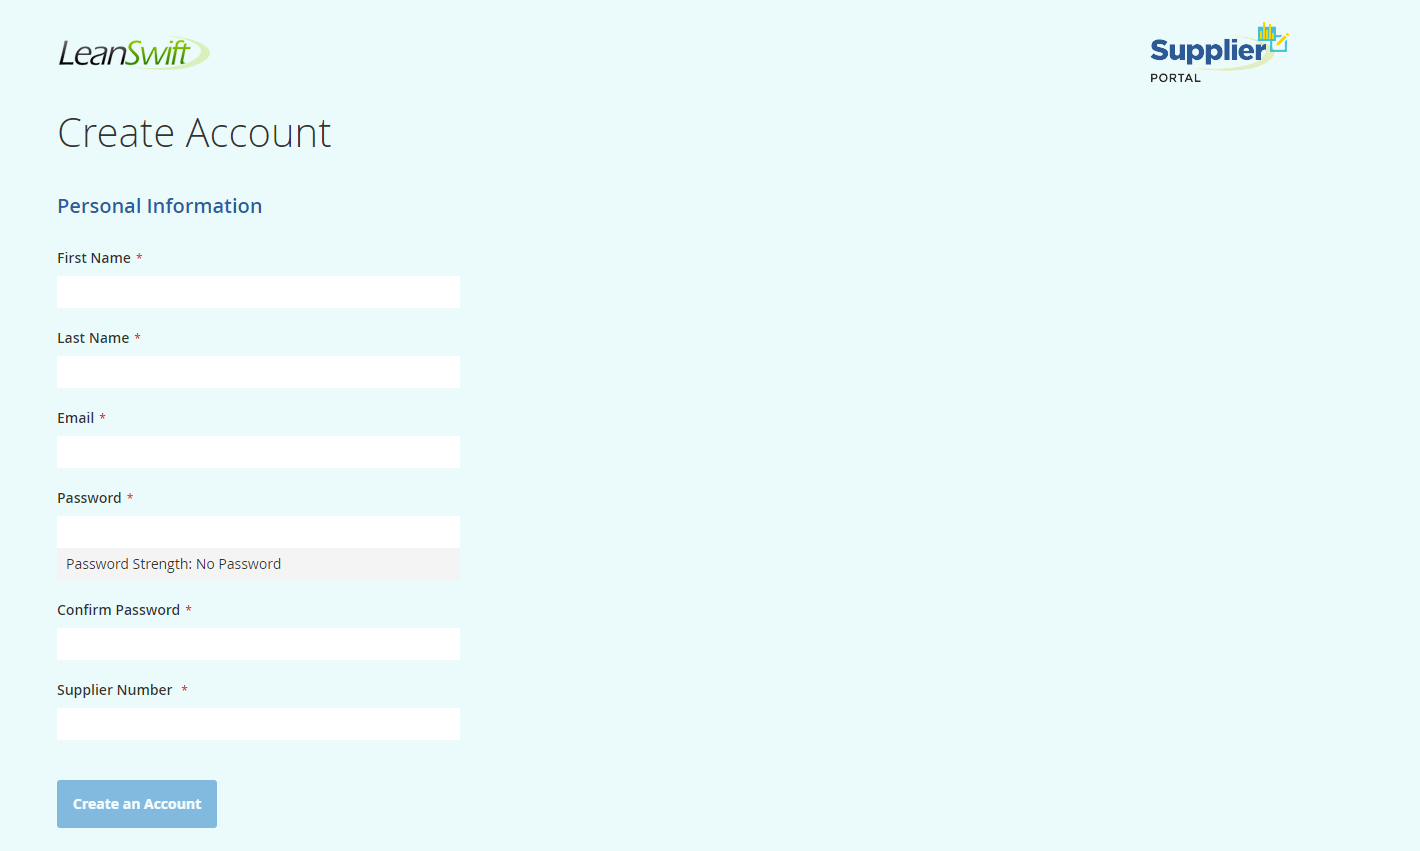
Prerequisites to register as supplier
- The supplier needs to be vendor in M3 and the supplier id needs to be in status '20' (approved) in M3.
- Already registered supplier id cannot be registered again.
- A user can either register as supplier or as econnect user and not as both.
Steps to register as supplier
- Go to Home page and select 'Create an Account'
- Based on whether econnect is installed or not , the registration portal appears with/without supplier theme.
- Once the supplier registration is completed and sent for buyer approval,user is notified with message “Thank you for registering with us. Your request has been sent for review. It may take a few hours or days to receive a response” in the homepage.
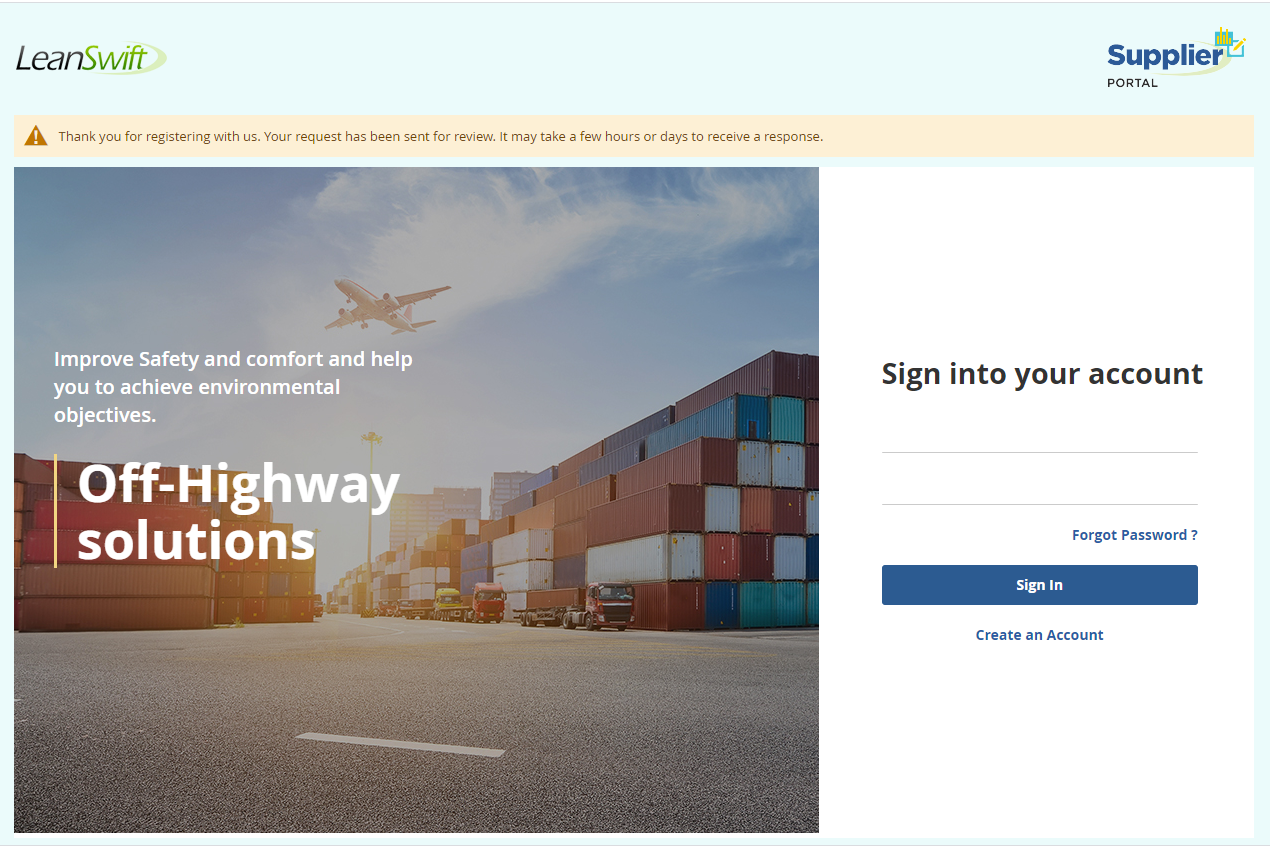
Note : Once registration is complete, approval request is sent to buyer. Supplier can login only after the buyer has approved the registration request. Supplier will be notified with email regarding the approval/decline of the registration to registered email id.
Log in
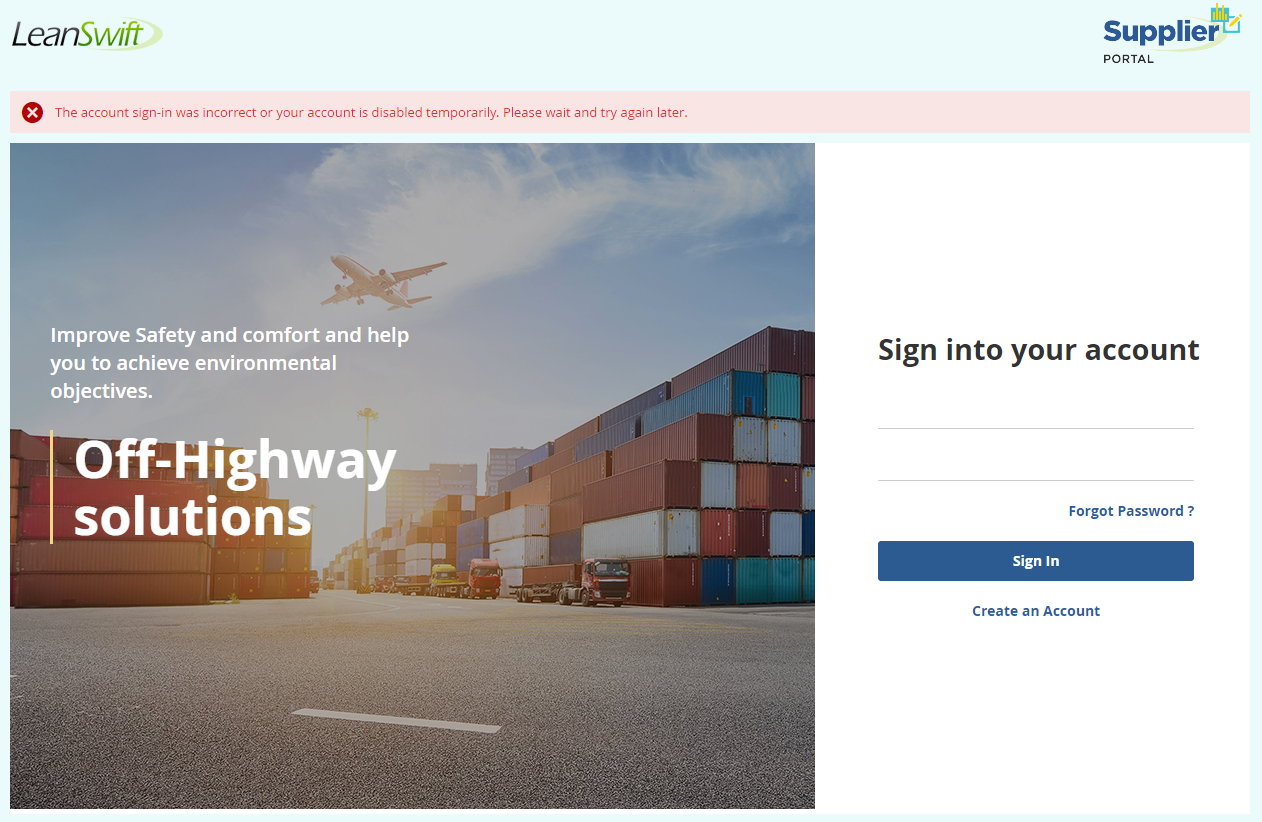
The Homepage/Login page has username and password text fields. It can also be customised to incorporate CAPTCHA.
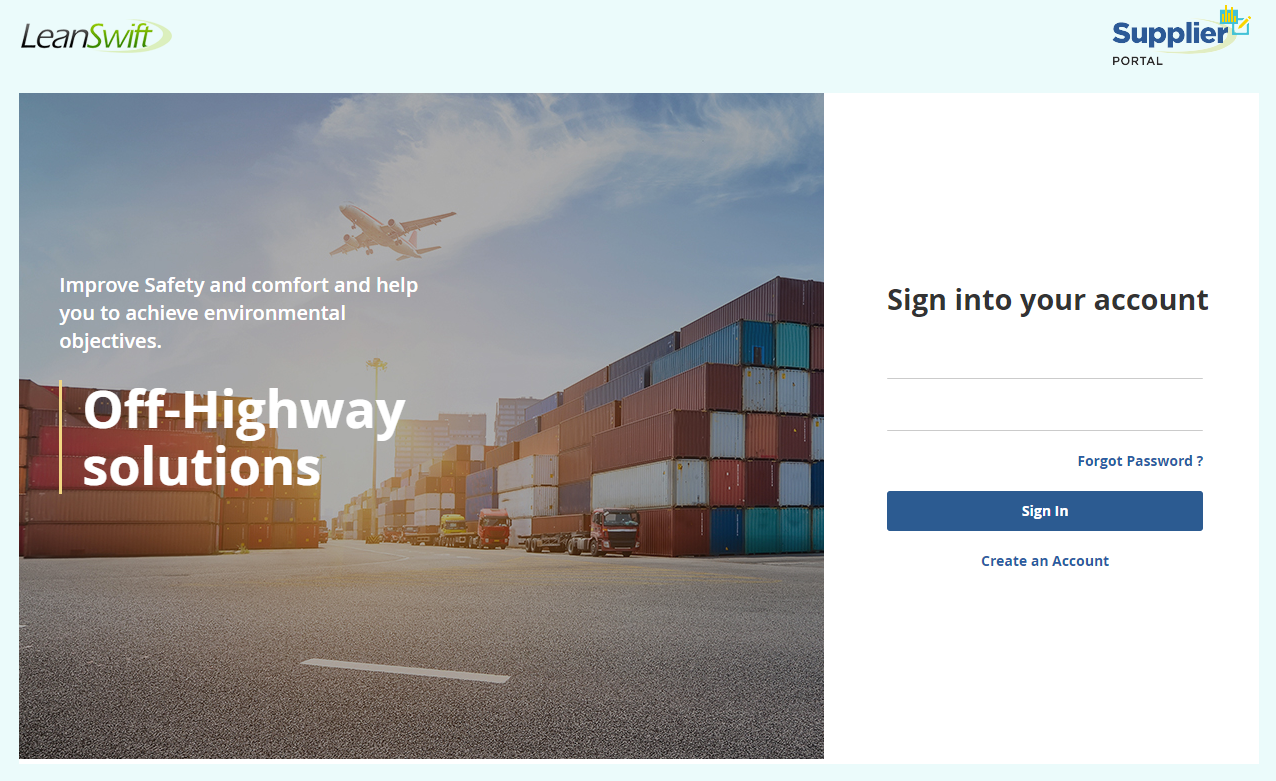
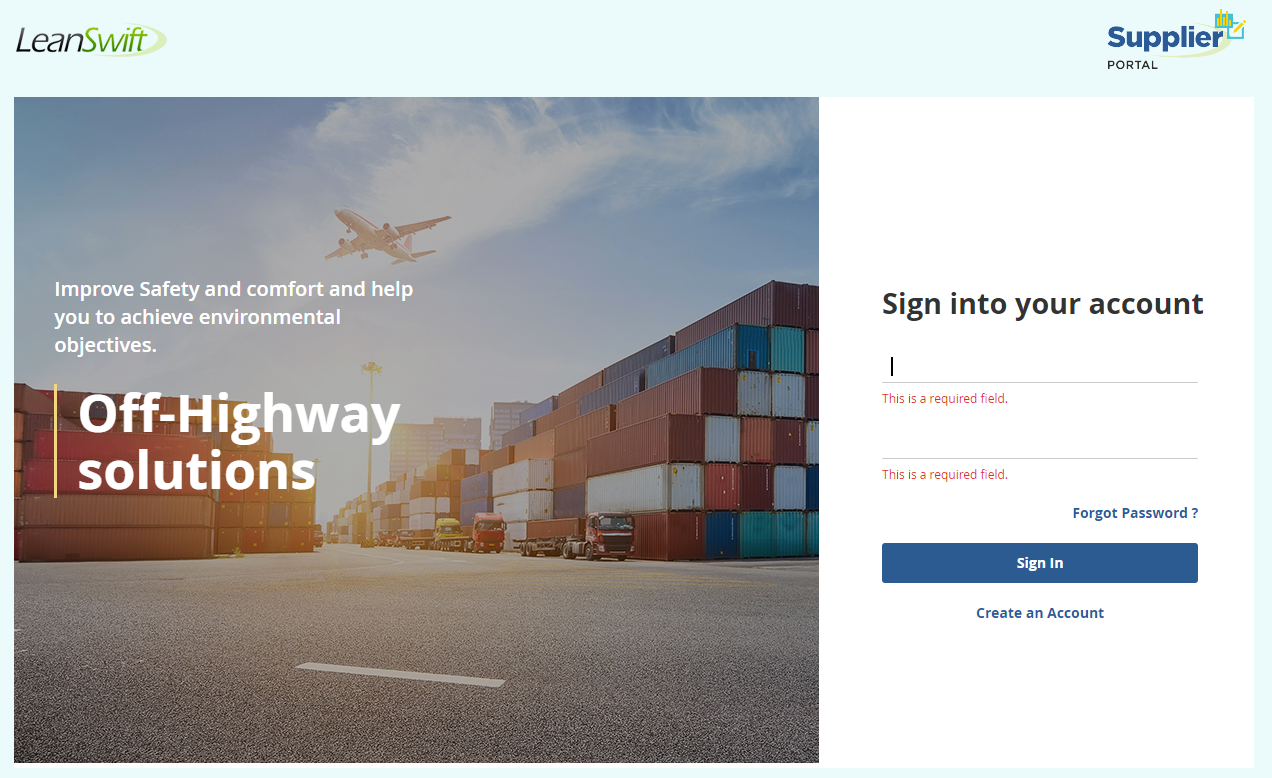
The homepage is customised with error messages for empty or incorrect username and password.
Forgot Password
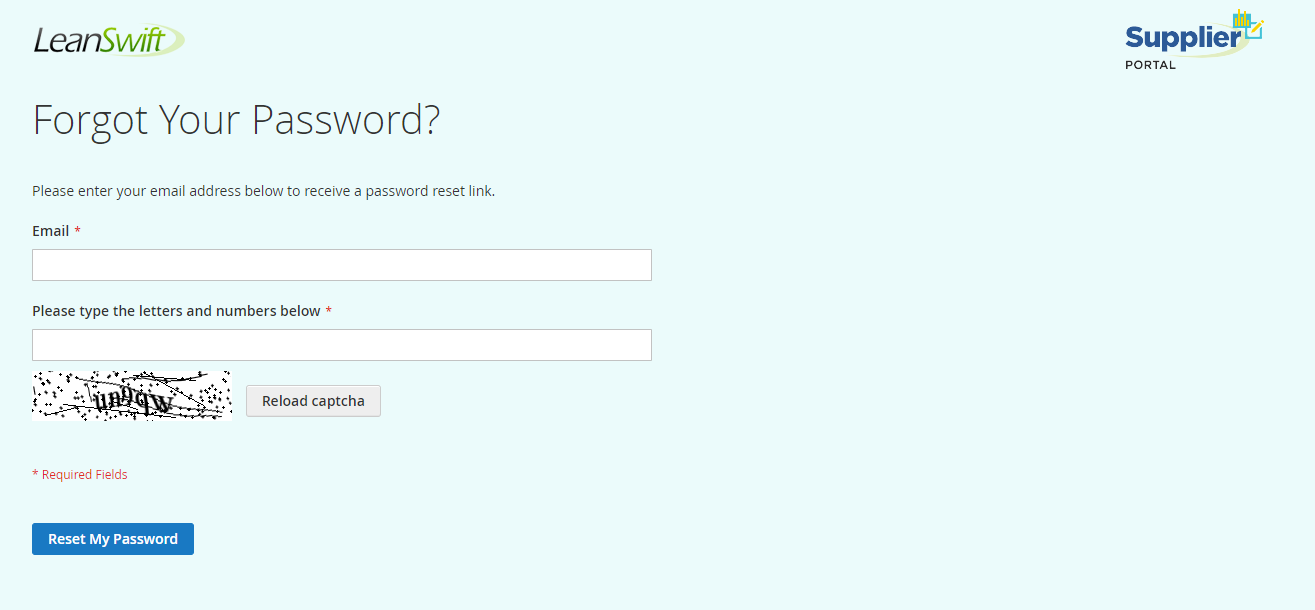
To change the password, click on forgot password link and enter the username and captcha and click on Reset My Password. An email will be sent to the registered mail id to reset the password.
My Settings
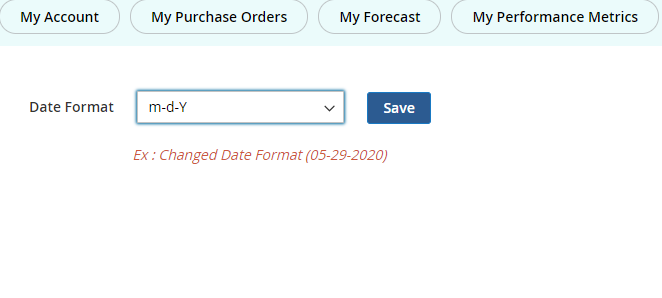
Date Format can be modified in this section. The selected date format will be displayed as Changed Date Format below the dropdown.
My Account
My Accounts section contains Account information and communication information of the supplier as well as general information of the buyer.
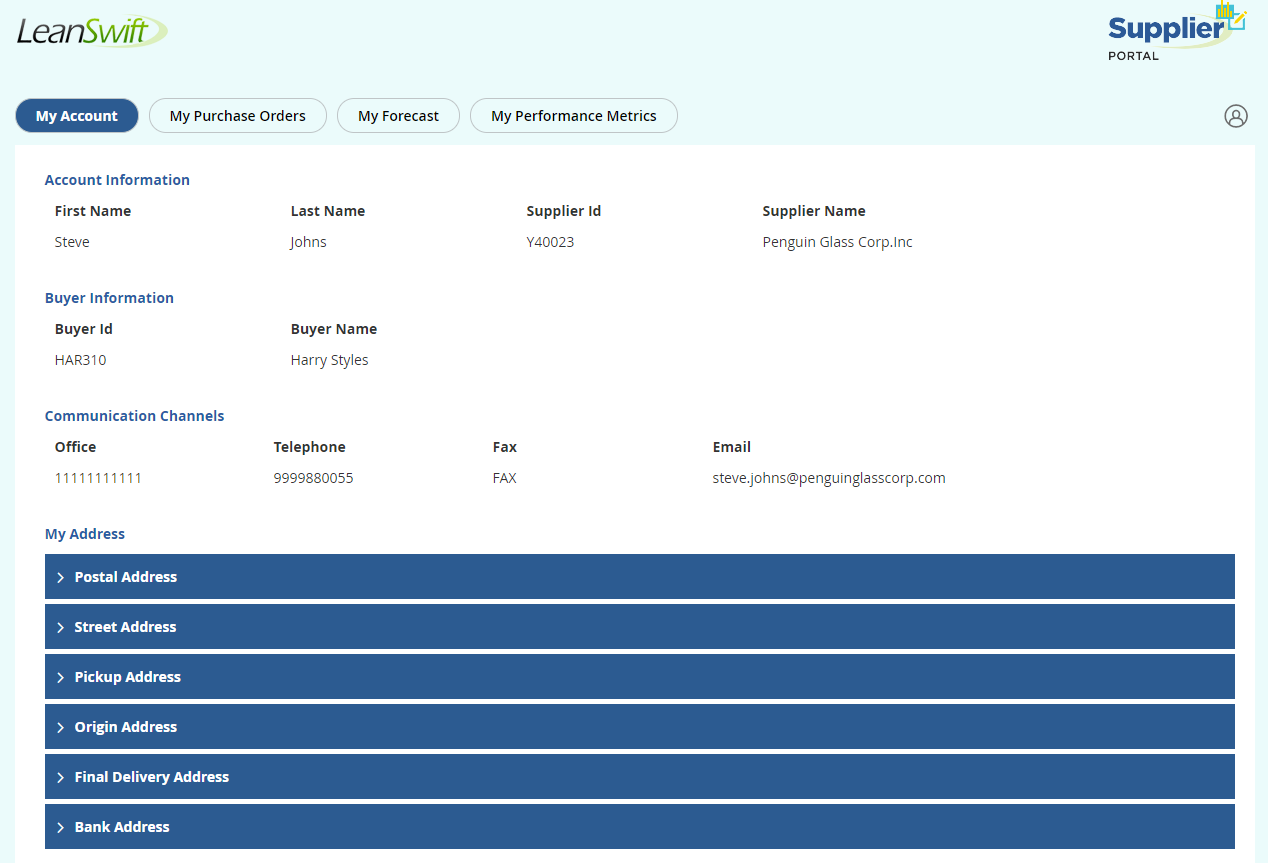
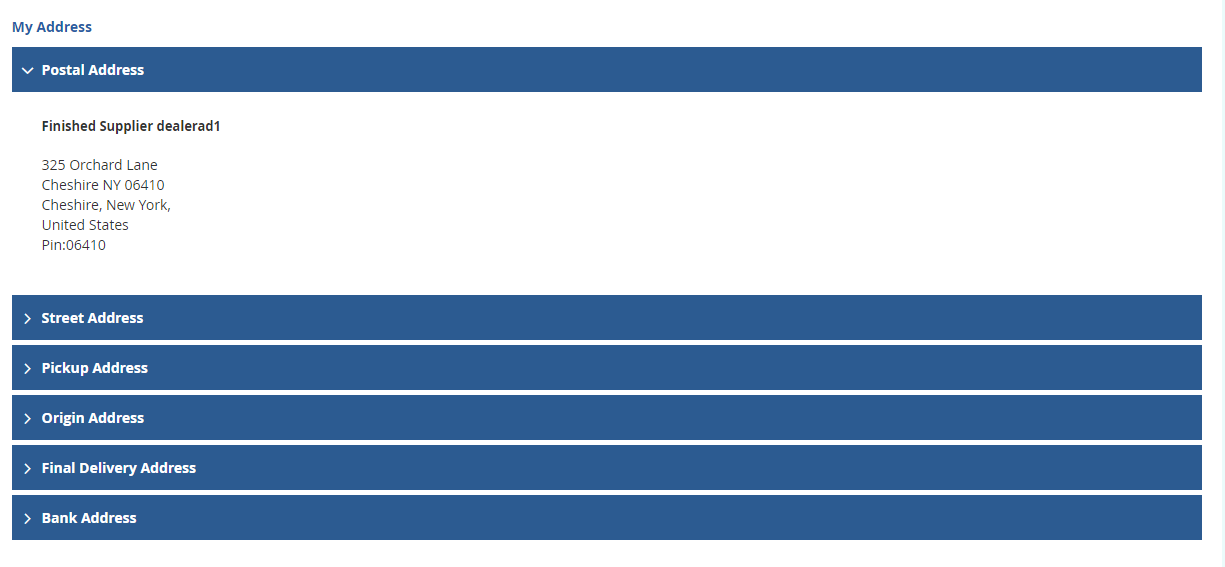
The different types of supplier’s address such as Postal Address, Street Address, Pickup Address, Origin Address, Final Delivery Address and Bank Address are listed in My Address section.
My Purchase Orders
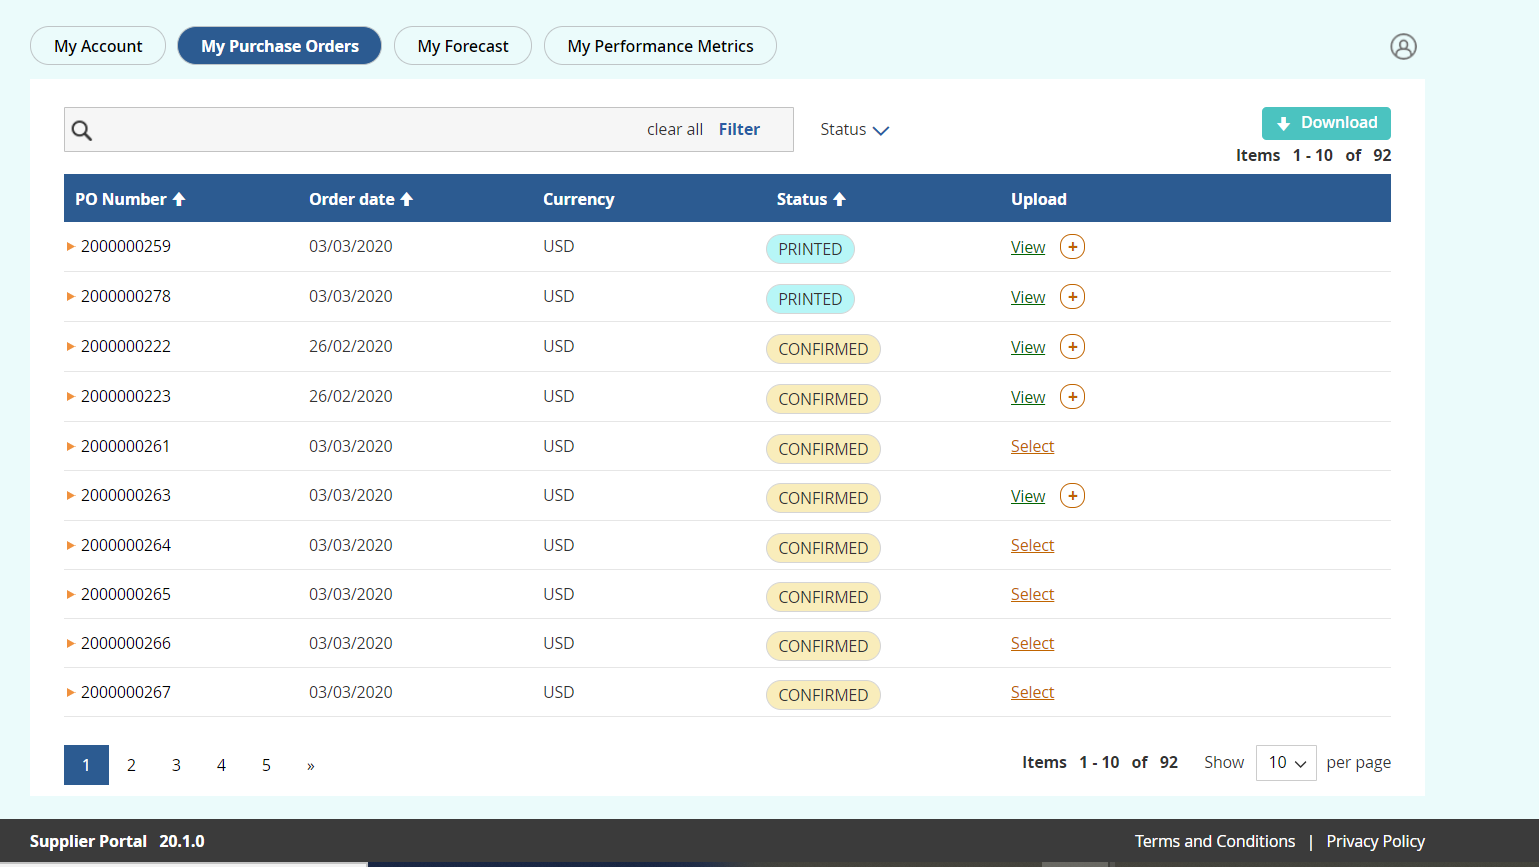
My Purchase Orders section contains all the purchase orders that belongs to the registered supplier. Based on the Purchase order (Normal or Delivery Schedule purchase orders ) indicators will be shown to differentiate.Each purchase order has one or more purchase order lines. Purchase orders holds the lowest status among the order lines. A single purchase order can hold more than 1000 PO lines and it will be displayed in a single page with scroll button.
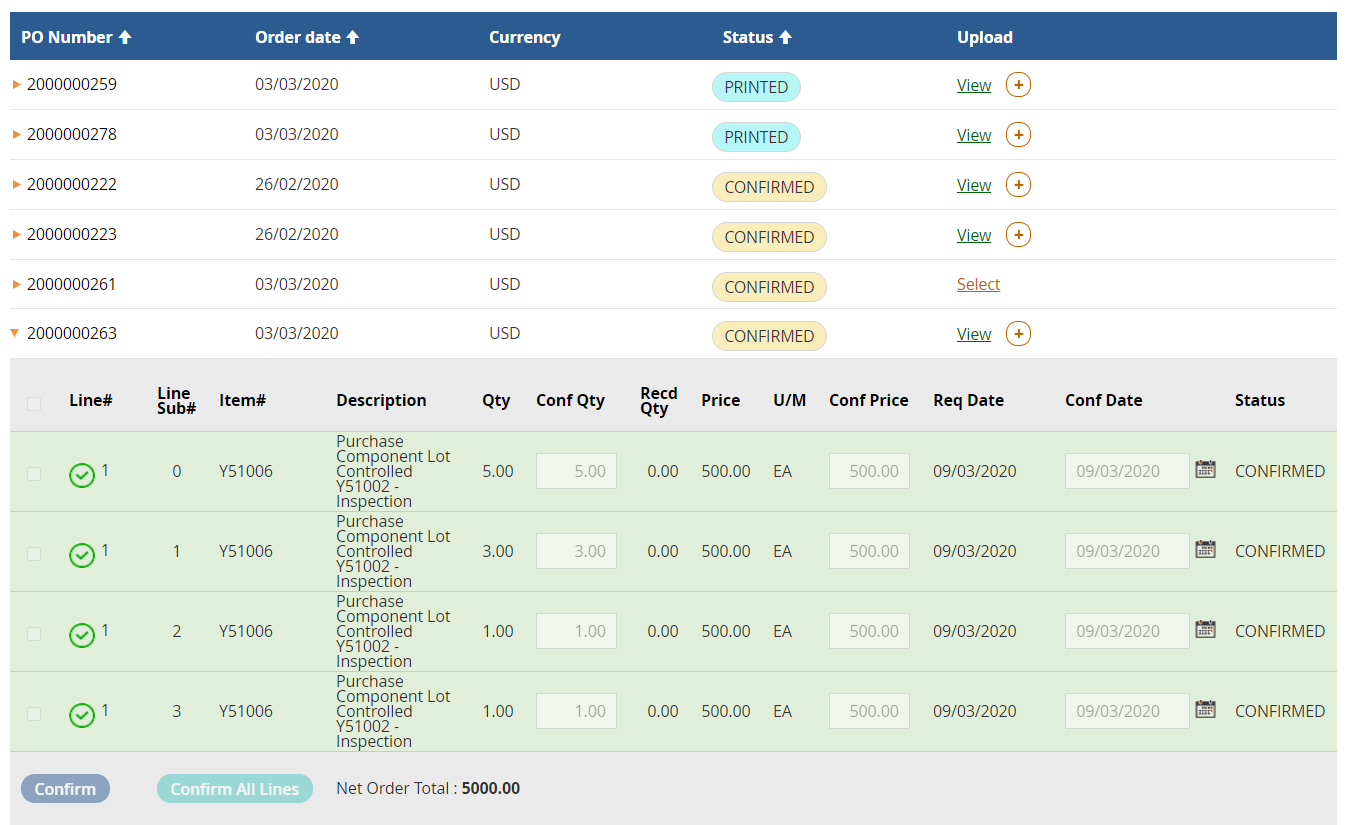
By clicking on the side arrow in a Purchase Order, it expands to display the purchase order lines and related information corresponding to the particular purchase order. The purchase order lines have Line Number, Sub Line Number, Item, Description, Quantity, Confirmed Quantity, Received Quantity, Price, U/M, Confirmed Price, Requested Date, Confirmed Date and Status. Single select, Multi select or select all of the purchase order lines can be done.
Paginate
Pagination is availabe to show a minimum of 10 PO to maximum of 40 PO per page. Each PO can have upto 1000 PO lines and it will be displayed in a single page.

Sort
PO number, Order date and Status can be sorted ascendingly or descendingly. By default the POs are sorted based on the status. Single click on arrow mark (symbol pointing downwards) determines that the sort is descending. Double click on the arrow mark (symbol pointing upwards) determine the sort is ascending.

Search
Search bar is available above the purchase order table. The Search bar is a text field and it also accomodates Filter and Clear all buttons. It provides a simple text search functionality and can be used to search both at PO and PO line levels.
Filter
Based on admin configuraion,the filter can perform Equals, Less Than, Greater Than, Contains, Starts With, Ends With. The number of filters that can be applied is configured in admin. The filters works in AND operation (if two filters f1 and f2 are added, the results will have POs that satisify f1 AND f2).

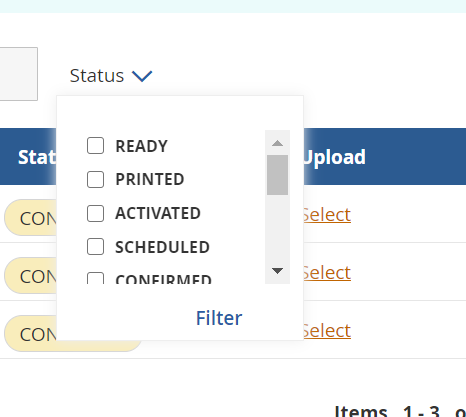
Filter on Status
The Status filter is a dropdown having a list of PO status such as READY, PRINTED, ACTIVATED, SCHEDULED, CONFIRMED, ASN, NOTIFIED, RECEIVED, PARTIAL REJECTED, COMPLETE, PARTIAL INVOICED, INVOICED.
Download as CSV
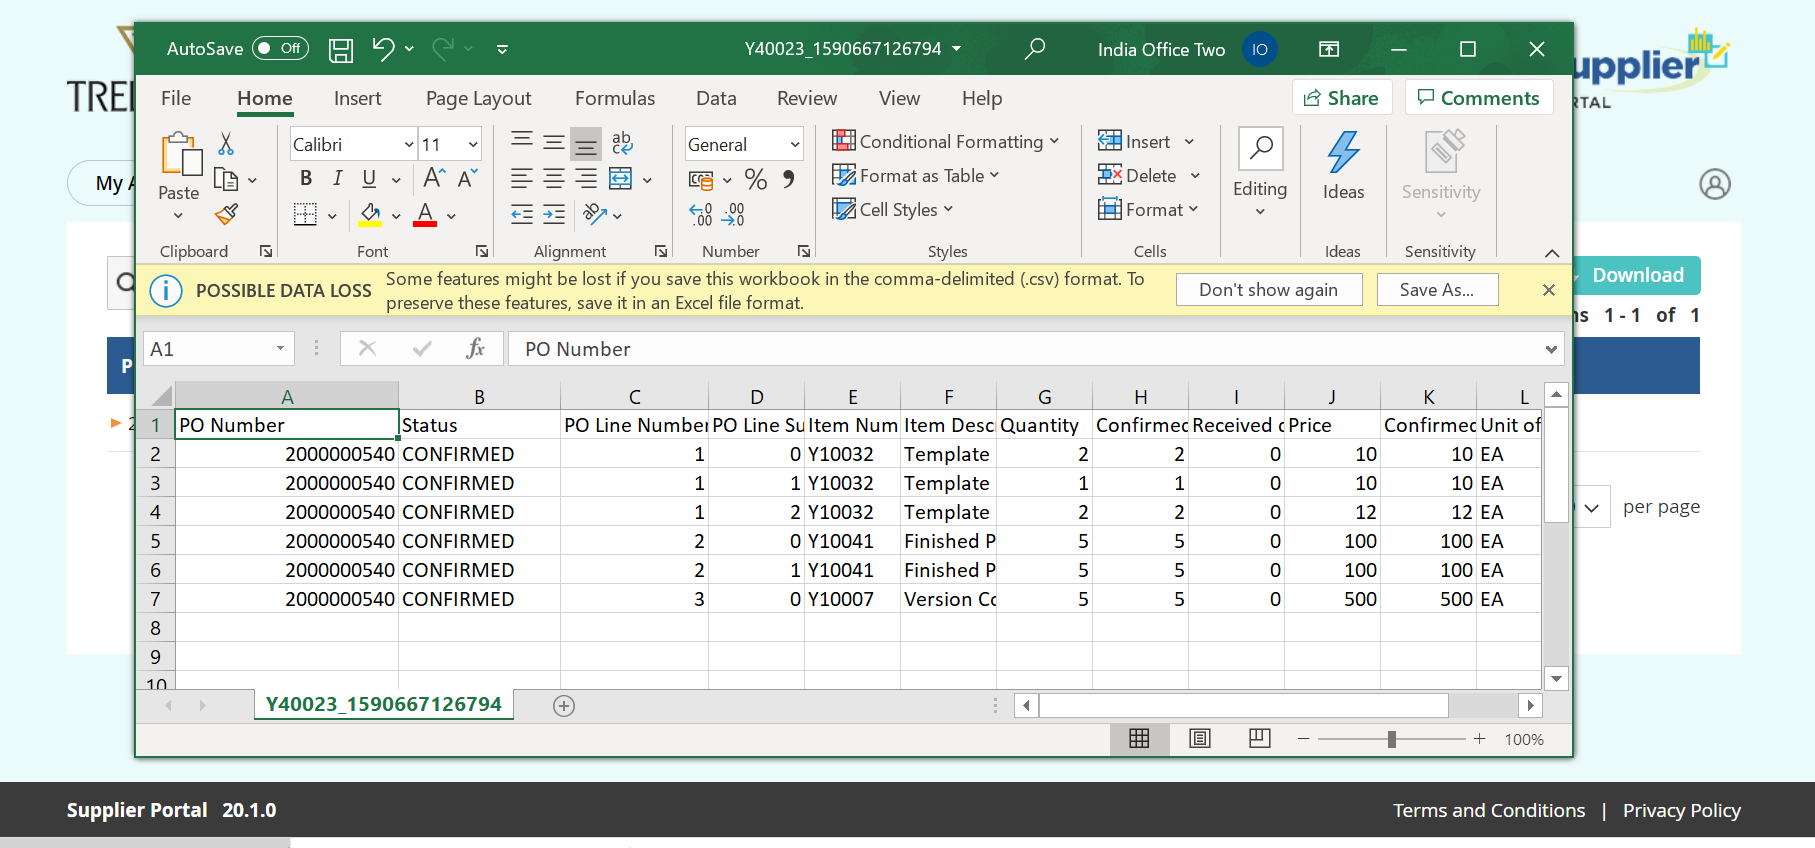
Download button is present in top right corner of the My Purchase Order page and My Forecast page. By default downloads all the data, When the purchase order/forecast POs are filtered, it downloads the filtered results in CSV format. Downloaded File Name has pre-defined format, Supplier number with Timestamp of download. For example, Y50001_1578908806.csv.
Confirm PO Line
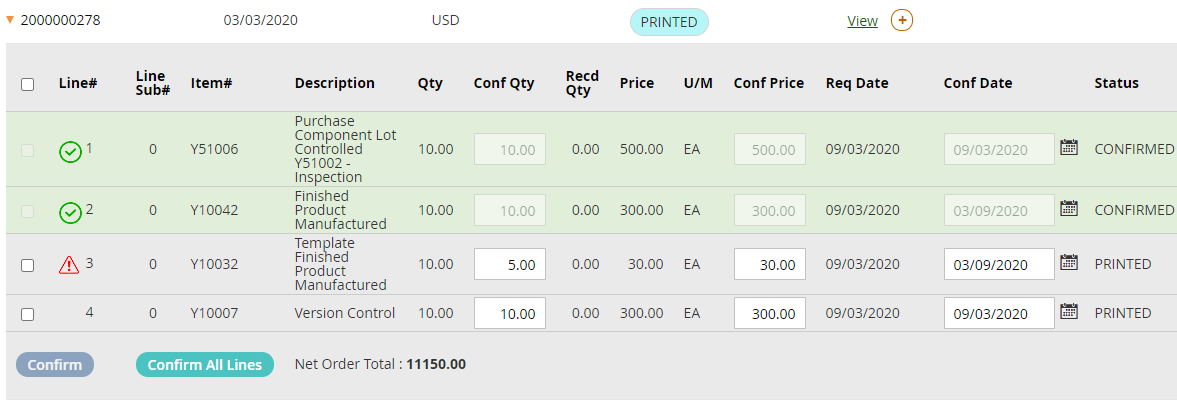
To Confirm a PO line select a single PO line or multiple lines and click on the Confirm button. Confirming a PO line can be done in two ways,
-
Confirm with changes :
When a PO line is confirmed with changes, approval request is sent to ION. To confirm a PO line with changes, Change the Conf Qty/ Conf Date/ Conf Price an click on confirm button. When Confirm with changes are done, PO Confirm approval request is sent to the buyer. The PO lines confirmed with changes has indicator with red dot to differentiate with lines confirmed without changes.
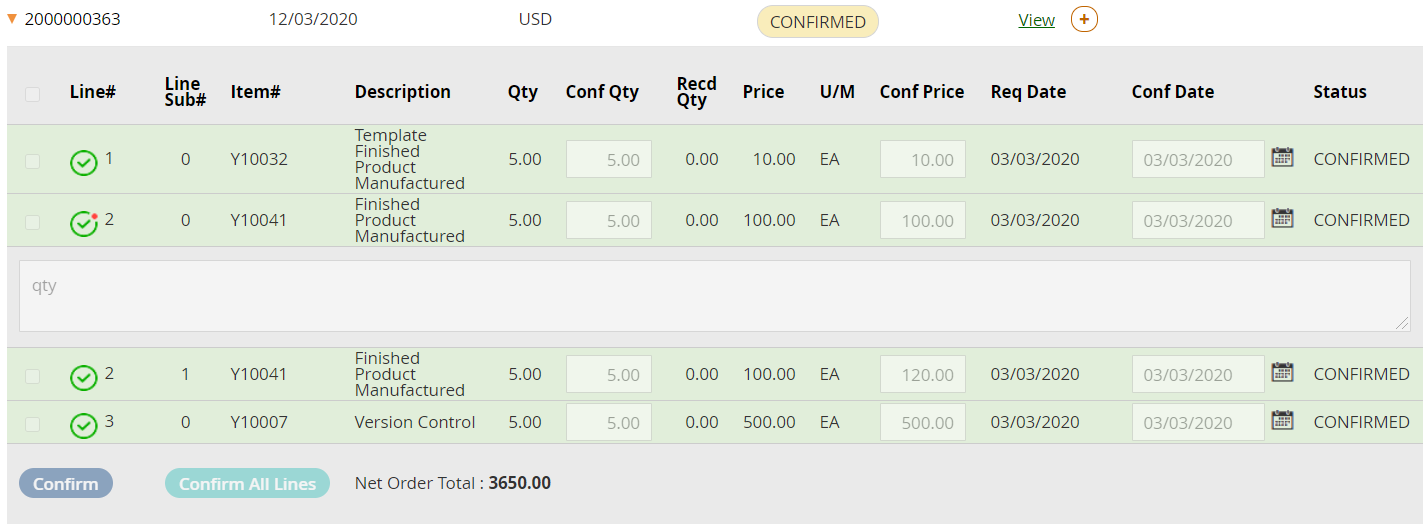
When a PO line approval is rejected by the buyer, it is update in the PO line with reject symbol.
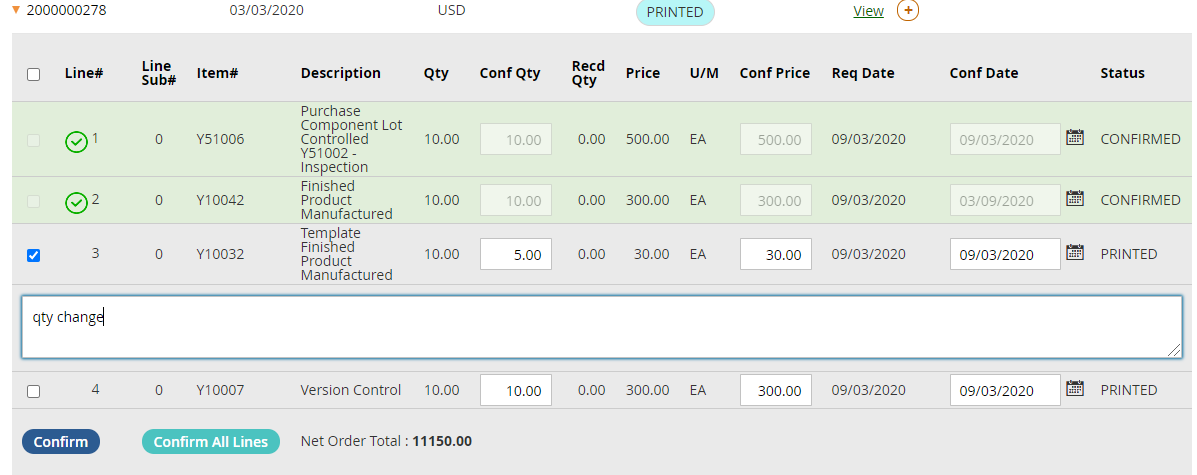
When PO line confirm quantity or date or price is modified, a text dialog box appears to add comments. User can add short notes to track it further. The text box appears for each PO line. When there is no change in conf qty/date/price, the dialog box is not shown.
-
Confirm without changes :
To confrim a PO line without changes, keep the conf qty/ conf date/ conf price as same as the requested date/ price/ qty. When a PO line is confirmed without changes, line is confirmed directly and no ‘PO Confirm approval request’ is not sent to the buyer. Confirmed line without any changes has a plain green indicator.

Apart from confirmed and rejected indicators, there is a waiting/Processing indicator applied to a PO line before it moves to confirmed state.

Confirm All Lines
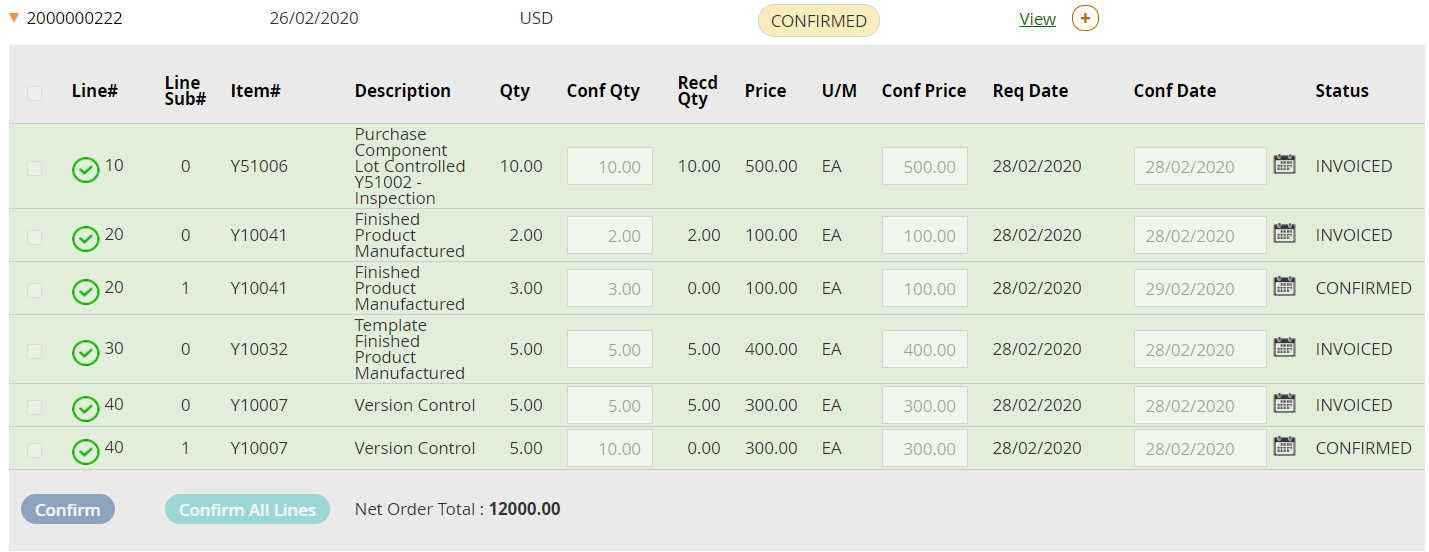
When Confirm All Lines is selected , all the purhase order lines in a PO is confirmed with same Confirmed Quantity/Price/Date as the Requested Quantity/Price/Date.
New in this version
Confirm Multiple POs
Users can confirm multiple POs together using the Confirm button available on top of ‘My Purchase Orders’ page. This can also be used to re-confirm mutiple POs with confirmed date change. ‘Confirm Selected POs (All Lines)’ window opens with ‘Date’ field which is prefilled with today’s date.
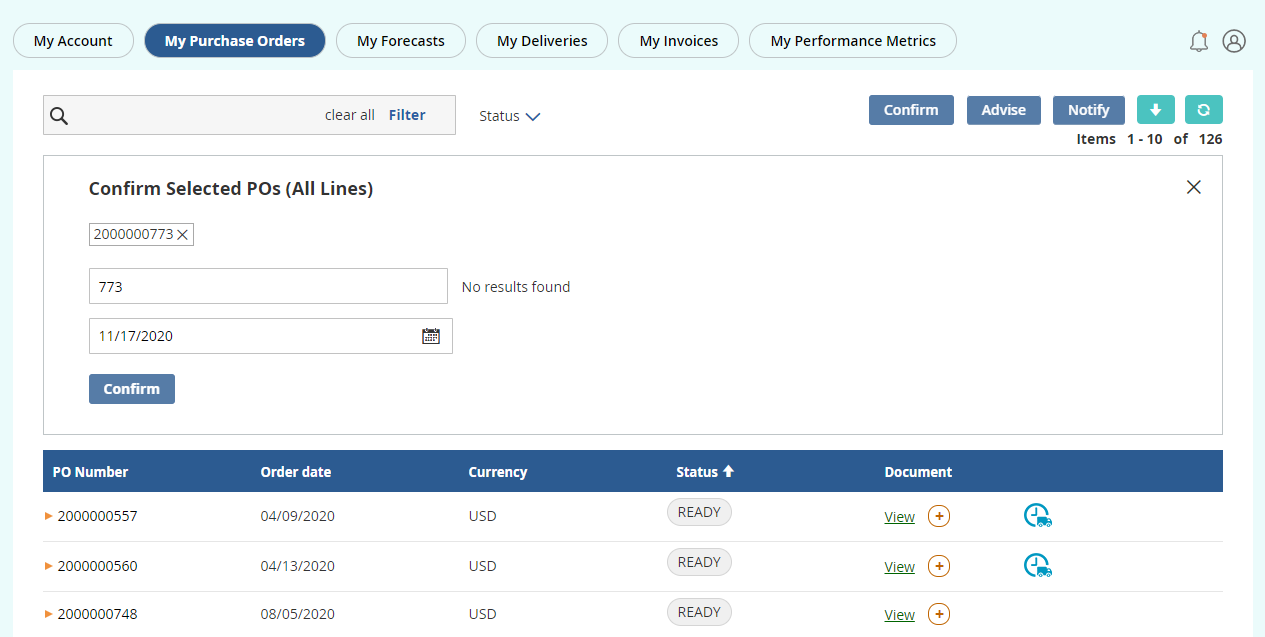
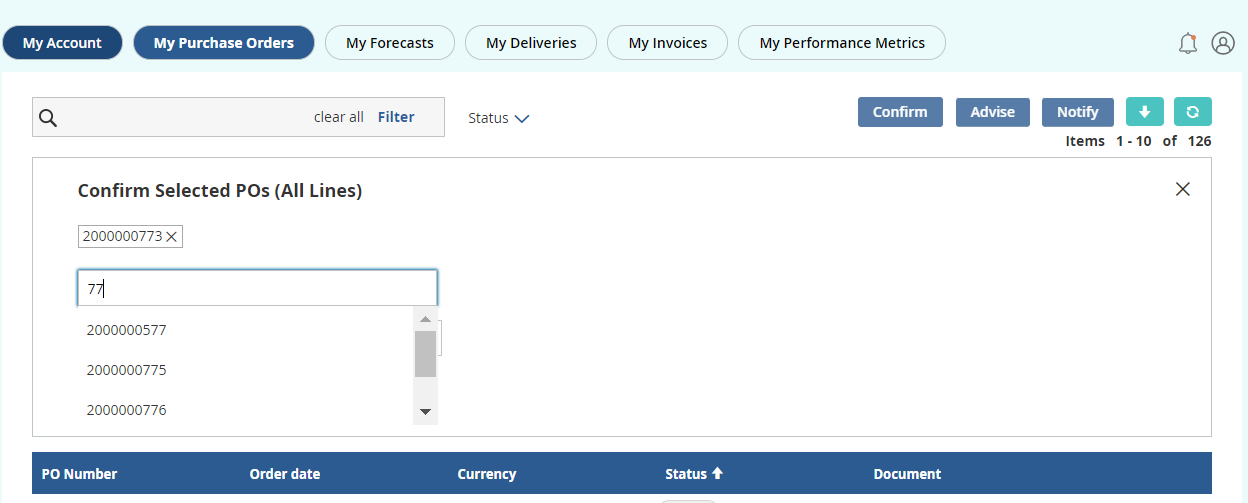
Additionally there is a ‘Search PO’ dropdown. Users can search order numbers and choose from the dropdown. Only eligible POs will be displayed in the dropdown (POs that are within the confirmed status).If user searches for a PO and that PO is not eligible for Confirm, or if PO number search does not match any results, User is displayed with a message ‘No results found’. As the user select’s PO from dropdown, it appears on the top with a ‘x’ mark beside it. Users can select multiple POs and can choose to remove it by clicking on the ‘x’ mark.
New in this version
Reconfirm PO
Users can confirm a PO line that is already confirmed (that is, reconfirm). Order lines with status ‘Confirmed’ (Status 35) are applicable for this irrespective of whether the previous confirmation was done with or without changes to the original request. The reconfirmation can be done any number of times as long as the lines satisfy the above requirements.‘You are about to re-confirm an already confirmed order line’ message appears when the user edits the Qty or date field.
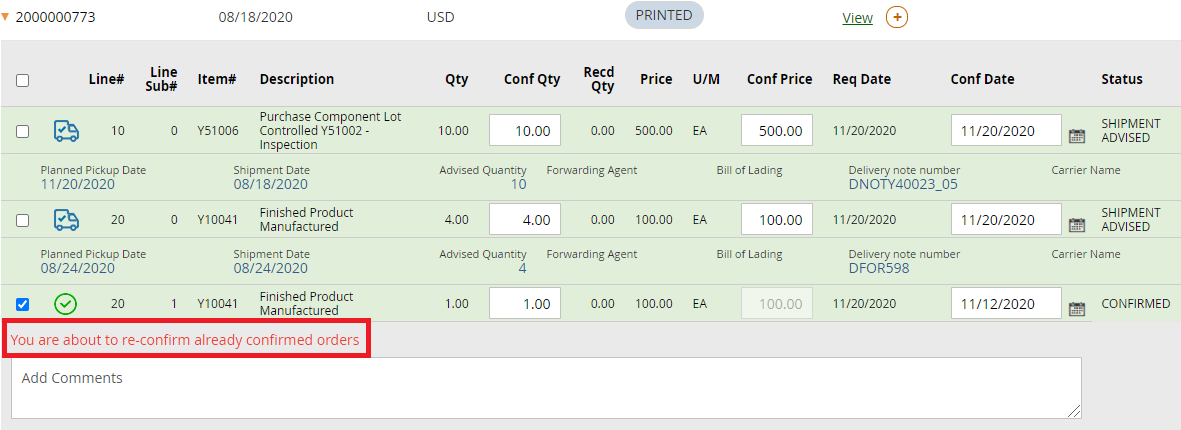
Choose eligible PO lines and click Confirm Button. For reconfirmation ‘Conf Date’ can be changed and ‘Confirmed Qty’ (Conf Qty)can be reduced but not increased. ‘Confirmed price’ (Conf price) cannot be modified.
Users can also add comments.
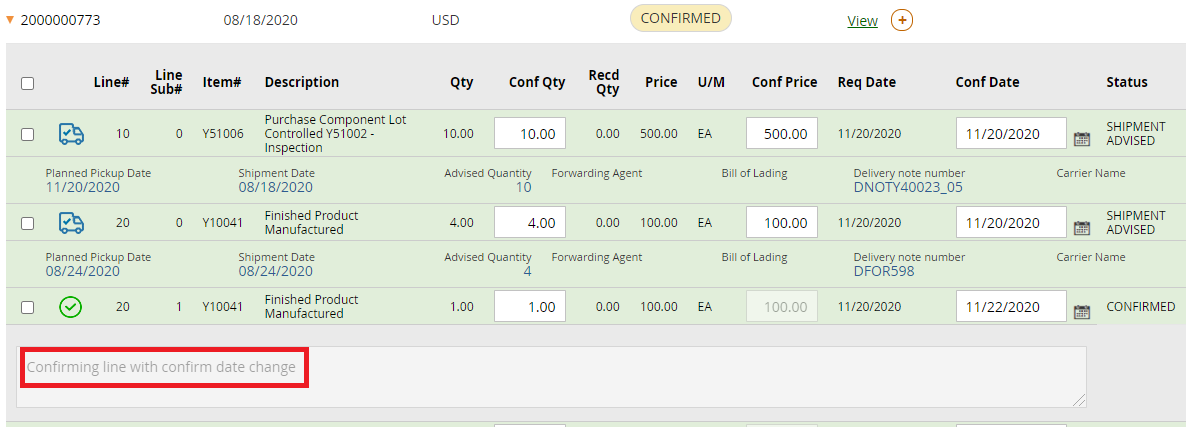
Once the Confirm button is clicked for reconfirmation, the process indicator changes to ‘Request is Processing’ or ‘Confirmation awaiting approval’ based on how the portal is set up to process PO confirm requests.
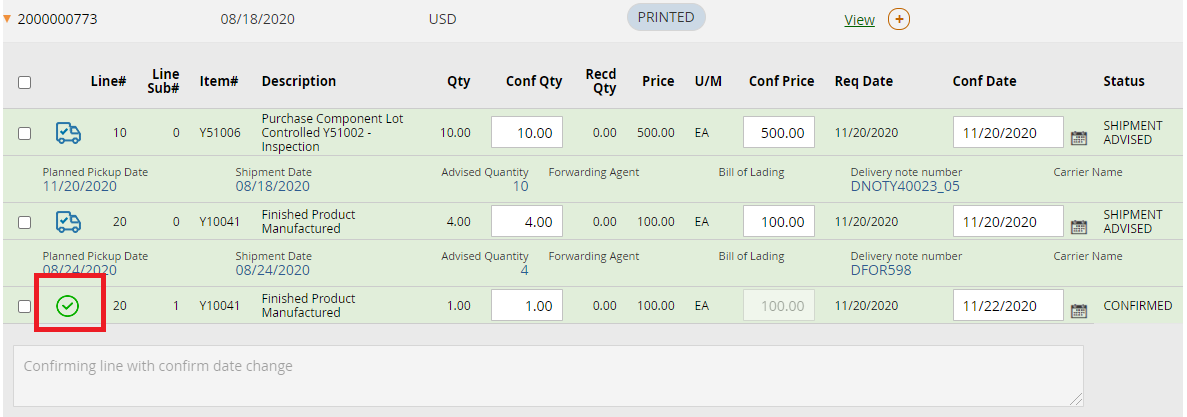
Once re-confirmation is done the process indicator changes to ‘Confirmed without changes’ (if ‘Activate approval process for Confirm PO’ is set to No’) or ‘Confirmed with changes’ (if ‘Activate approval process for Confirm PO’ is set to Yes’)
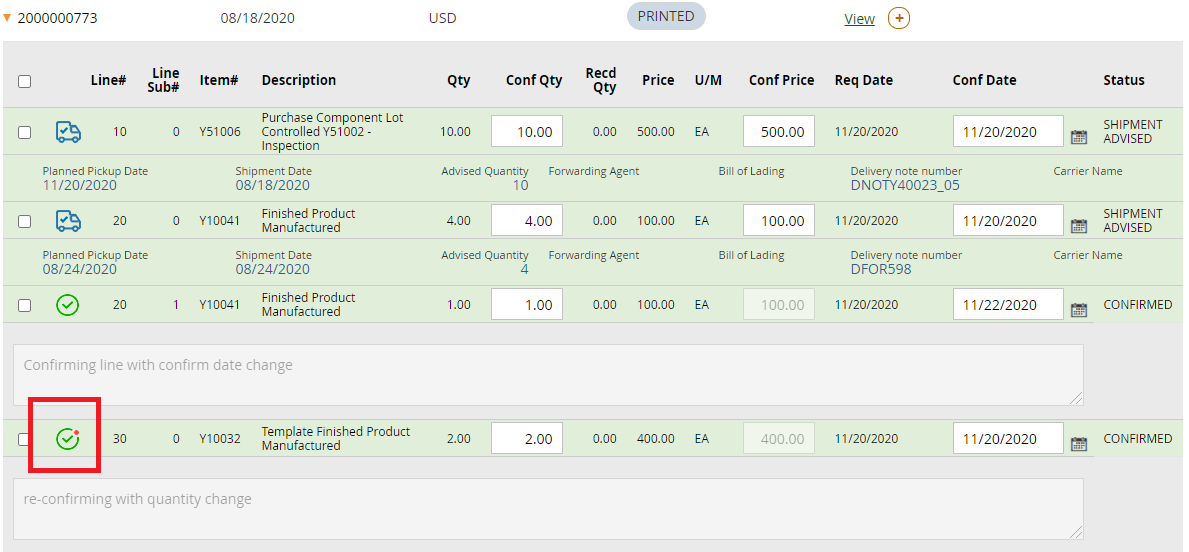
For more information about process indicator changes refer version 1.0 of the User Manual (https://github.com/leanswift/leanswift.github.io/blob/master/supplierportal/src/pages/20.1.0/usermanual-supplierportal-user.md#confirm-po-line)
The comments added during re-confirm can be seen below the PO line
Upload to IDM
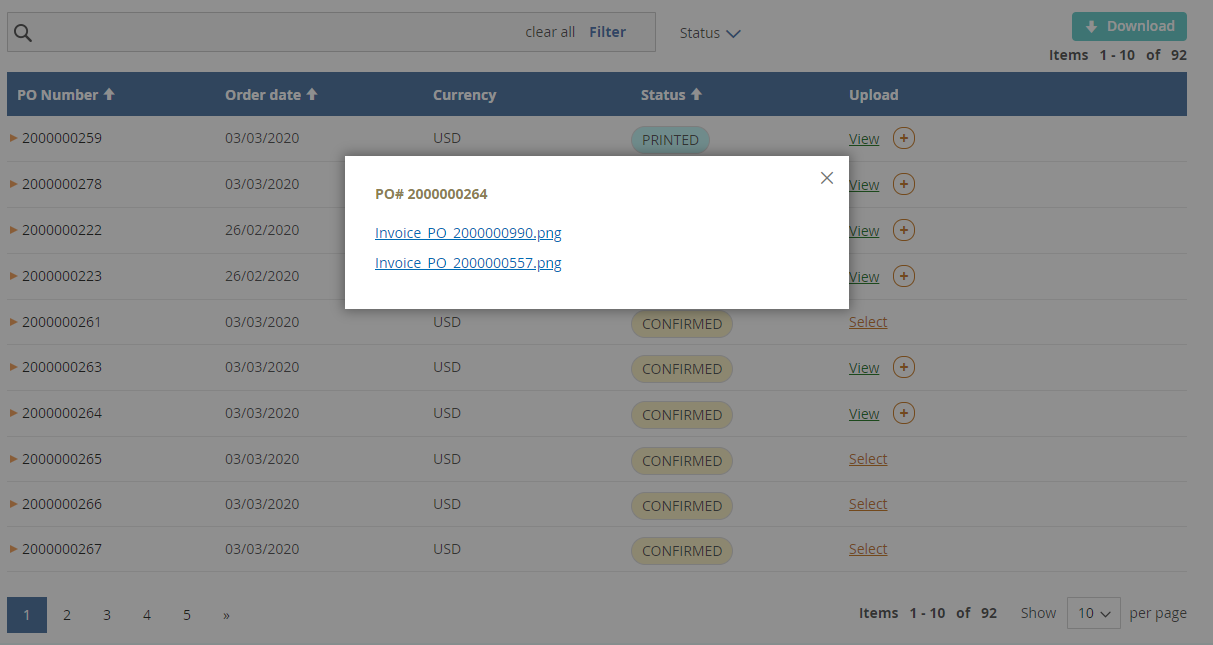
To add / view notes or extra information related to a purchase order, one can upload/download IDM document. To upload a IDM document, click on the select option under Upload secion and upload a document. Document type that can be uploaded is configured in the backend.
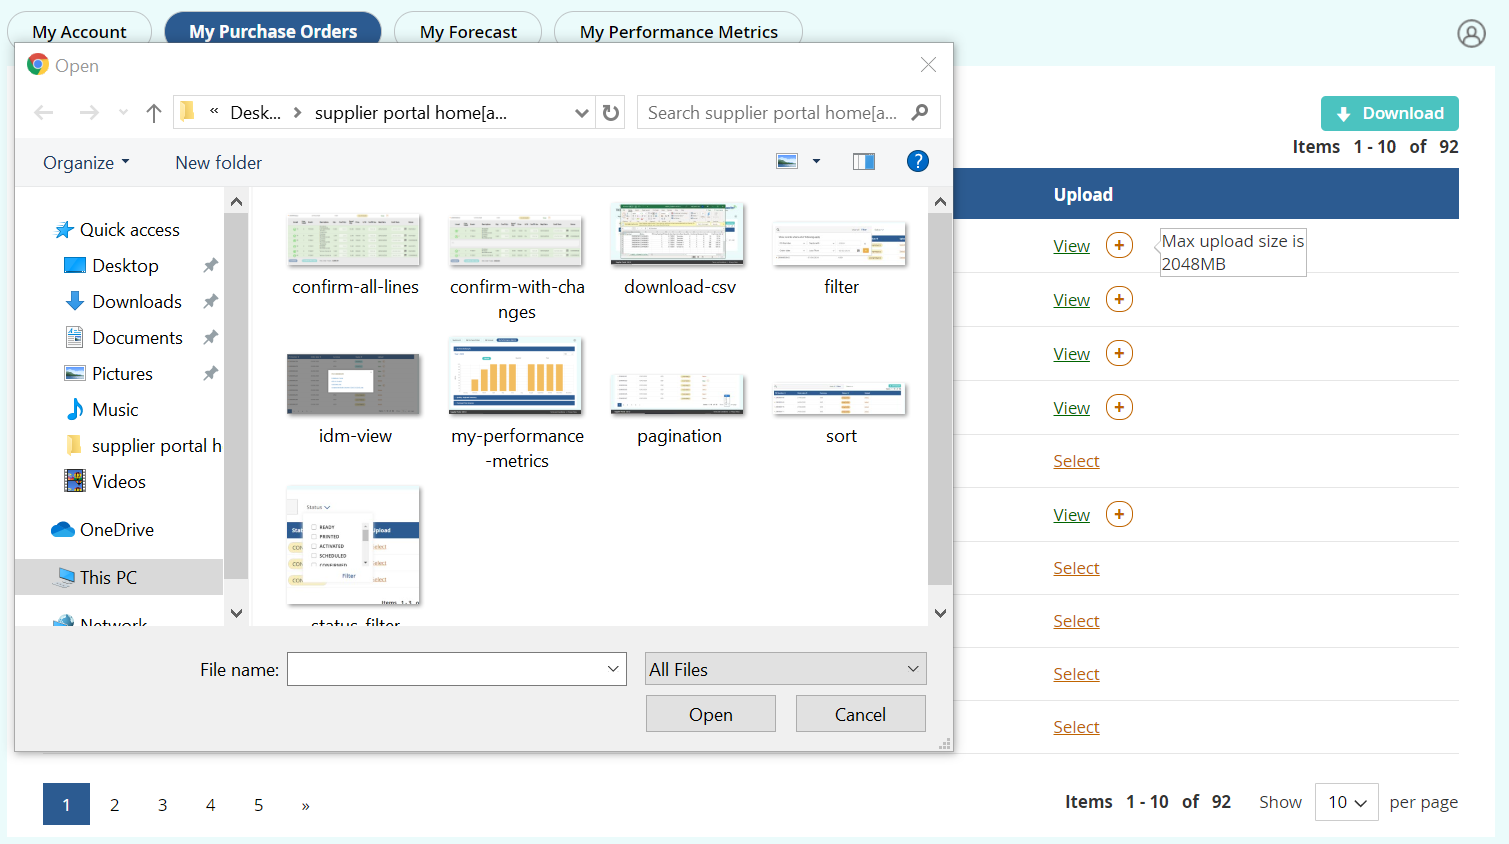
To view the document attached for a particular PO, click on the plus symbol. A pop-up is displayed with document uploaded for a particular PO.
My Forecast
My Forecast page list the Planned purchase orders created via delivery schedules. The Forecast page has the functionalities such as,
Paginate
Functionality is similar to Pagination in My Purchase Order section. Refer Paginate.
Sort
Functionality is similar to Sort in My Purchase Order section. Refer Sort.
Search
Functionality is similar to Search in My Purchase Order section. Refer Search.
Filter
Functionality is similar to Filter in My Purchase Order section. Refer Filter.
Download as CSV
Functionality is similar to Download as CSV in My Purchase Order section. Refer Download as CSV.
Enhancements
- Status column is removed from My Forecast page
- Forecast is filtered to display planned purchase orders without auto-warning or auto-error.Refer Enhancements
My Performance Metrics
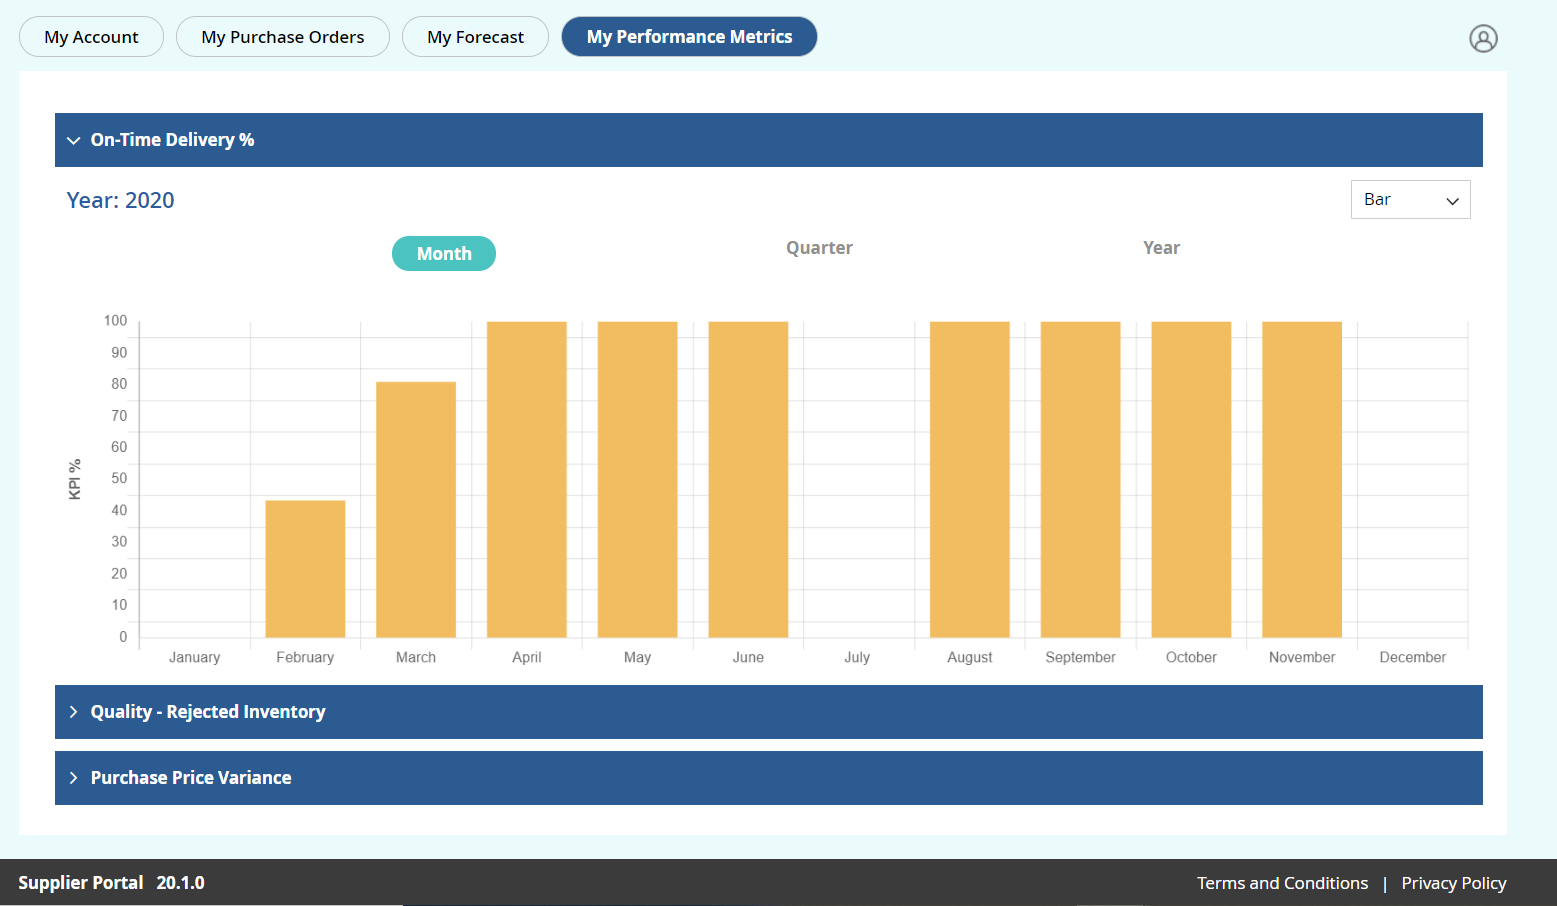
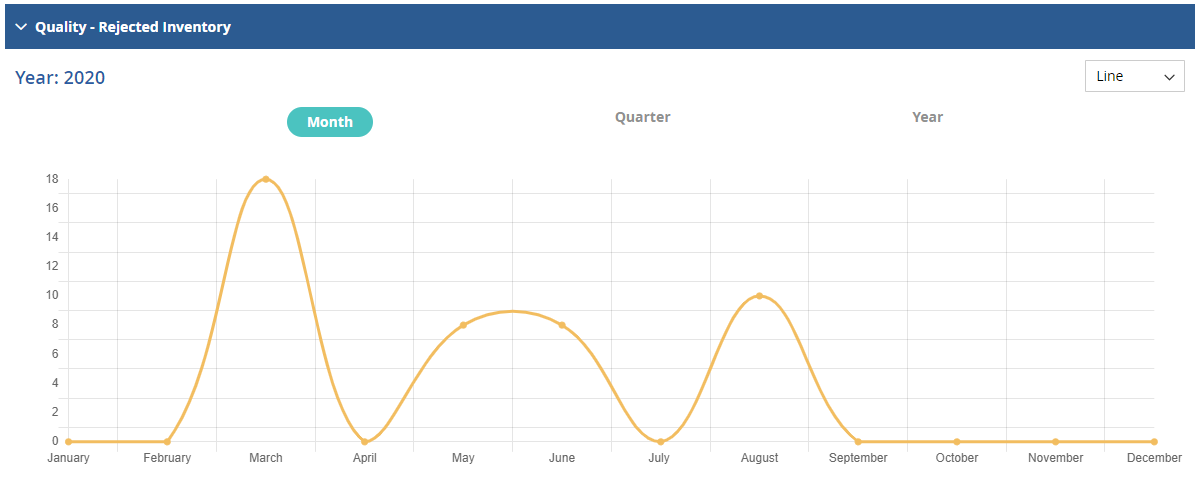
Currently there are three types of graphs supported, they are :
- On-Time Delivery
- Quality - Rejected Inventory
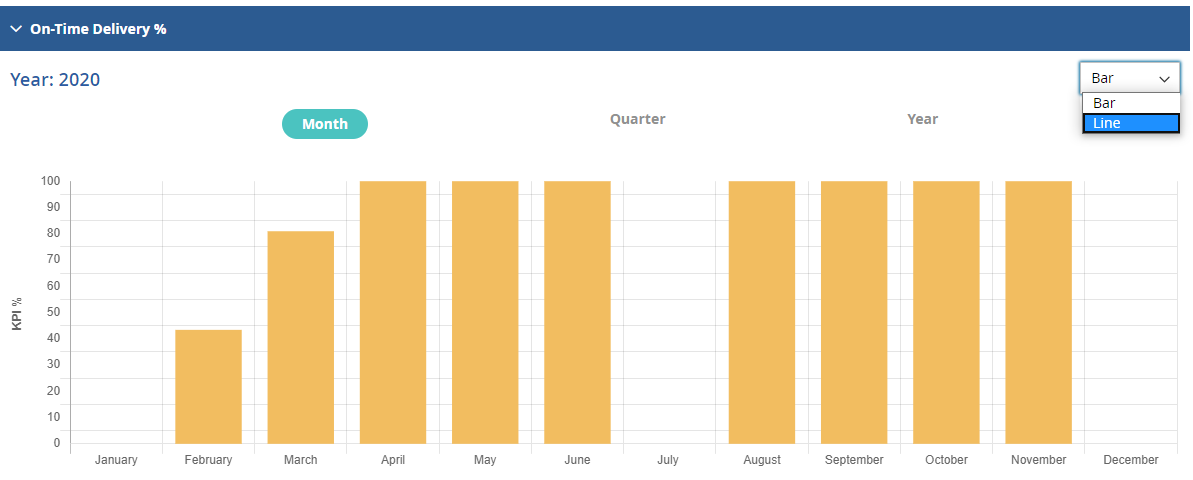
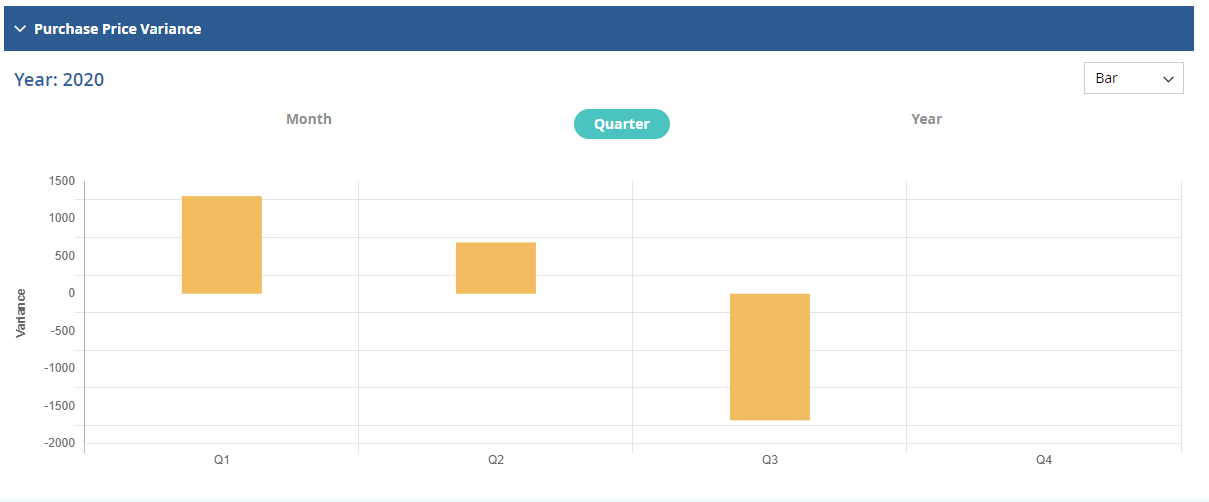
- Purchase Price Variance. Graph can be viewed either as bar or line chart (selected from dropdown in right corner). The graph can also be plotted for Monthly , Quarterly or Yearly based on the options selected.
On-Time Delivery %
This metric records the percentage of inbound deliveries received on time, that is Requested Delivery Date Vs Actual Delivery Date.
Quality - Rejected Inventory
This metric records the total number of rejected supplies in a given period of time, that is Rejected Quantity.
Purchase Price Variance
This metric records the difference between the actual price paid to buy an item and its standard price as confirmed by the supplier, multiplied by the actual number of units purchased (Confirmed Quantity), that is, Confirmed Price Vs Invoiced Price.
New in this version
Bell and Email Notifications
Bell Notificaiton is used to display all the latest changes or additions of POs and it is available globally next to the settings icon.

The bell icon has a red-dot which indicates that there are unread notifications (once all notifications are read, red dot is removed ).The notification is highlighted in bold initially, once it is clicked bold is removed symbolising that the message is read.
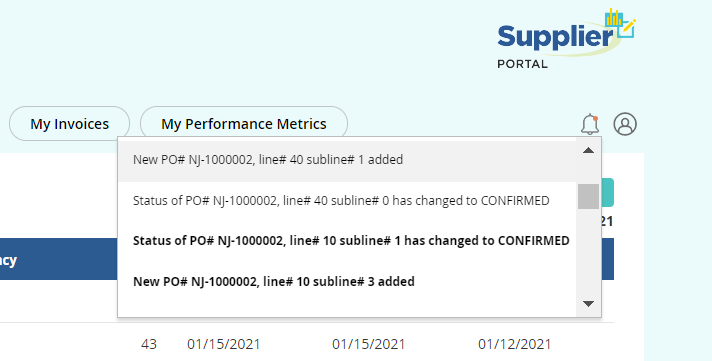
Email notifications are sent to the Supplier and Sub accounts (Based on sub-account users if they have permissions to the respective screens) when the following events occur:
- When a new Purchase Order is added
- When Conf Date (and/or) Conf Quantity (and/or) Conf Price is changed(Any changes to PO upto status 35 is triggered and mail is sent to supplier)
- When a new Purchase Forecast is added
- When a Forecast is updated in the portal
Email templates are available in the configuration, the details of which can be referred from here(https://github.com/leanswift/leanswift.github.io/blob/dev/supplierportal/src/pages/20.1.0/usermanual-supplierportal-admin.md#email-templates)
Log out
To Log out click on the profile icon and select sign out. After logging out the page refreshes to home page after 5 seconds.
![]()
